Tuesday, February 28, 2012

McCall's 7590, AKA the Cocoa Beach Shirt


From 1964 comes the Cocoa Beach Shirt!  Yay!  


This shirt was so much fun to make and I'm totally in love with its retro vibe.  The fabric is a cotton voile from Denver Fabrics and the print seems made for this style.  


Of course the look is never complete without the pipe!  


The back view.  Pleats extend from the yoke to the hem.  There is a button detail at the hem which adds interest.  


The pattern matched up nicely at the front.  I love when that happens!  


Here's a close up of the pick stitch detailing on the collar and shirt front.  I know that this is going to be my "go to" shirt for the summer.  I'm looking forward to making 2 or 3 more!  

Victorian shirt #2 -- Afternoon tea


Welcome!  Today we're having tea.  I'm pulling out the tartan English bone china and wearing Victorian shirt #2 for the occasion.  


This is my own revised version of Folkwear # 202.  The bib sections have been cut on the bias and the placket has been redesigned to simplify construction.  The new placket also eliminates the center front box pleat of the original design.  


The fabric is a celery green and white stripe Italian cotton shirting from Denver Fabrics.  It was wonderfully easy to work with. 


The fabric is very finely woven so I made this version with a doubled back French cuff.  The buttons on the placket are white genuine shell that I found at the flea market.  The cufflinks are vintage pearlized green button links that I found on Ebay.  The steampunk brooch is gift from my daughter.  


It all goes wonderfully with my brocade vest.  I now have two versions of this shirt, and feel prepared to face any special occasion with style! 

Thursday, February 23, 2012

The Cocoa Beach shirt...... some details


It was a rainy day here in Maine, a good day to work on the Cocoa Beach shirt.  This is a shirt that I would make again in a heartbeat.  I keep fantasizing about all the $2 / yard seersucker that was in one of the fabric dives in NYC last year.  I'm hoping to get back there next month, and hope some of that stuff is still around.  I'm willing to put up with the incense and newspapers spread all over the floor.  

Here are some details of the sleeve tabs on McCall's 7590. 


The tab is basted to the outside of the sleeve along the edge where the hem is turned up.  It will eventually point forward, but at this stage it point towards the back.  


The hem is turned up to the outside of the sleeve so that the right sides of the fabric are together.  I had originally tailor tacked the stitching lines and for once they stayed in.  Here I've chalk marked the stitching lines.  


Stitch along the lines catching the tab.  Then slash up through the middle of the triangle up to the point.  


Turn right side out and....   voila!   tres retro! 


This is the back pleat detail.  I made a non functional buttonhole and sewed the button over it.  


The pattern calls for topstitching all around the shirt fronts and collar.  Um,  anyone who has followed this blog knows I'm not a big fan.  I think it would be more interesting, and more in keeping with the retro vibe, to have a handstitched detail.  Using two strands of embroidery floss I'm doing an enlarge pick stitch.  I've placed masking tape 1/4" in from the edge to help me stay on track.  This is so much fun to do, and silly as it may sound it really makes this MY shirt.  


Here's the whole collar taped and ready to be stitched.  Next week I hope to show the completed shirt.  

If anyone's interested, the fabric I've used is currently on sale at Denver Fabrics for $4 / yard.  It comes in several different color ways and is 60" wide.  It's been easy to work with, hasn't frayed like crazy and has a crisp finish almost like linen.  I imagine it will wrinkle like a linen shirt.  Enter " voile" in the search and you should find it.  

Wednesday, February 22, 2012

Another day at Cocoa Beach


Work is progressing smoothly on the Cocoa Beach shirt.  I supposed it's true of all sewing, but the more shirts one makes the easier it gets.  I just sort of blow right through things that used to leave me either scratching my head trying to figure out, or just plain paralyzed with fear.  I did spend a considerable amount of time cutting out the fabric.  If all goes well the pattern should match at the front.  

This is a pretty basic shirt with a yoke.  On a plaid, or a blocky print like I'm using, it's easiest to cut the yoke on the bias.  This eliminates the whole matching issue on the back.  I'm also skipping the patch pockets which I think would detract from the overall look.  


All the seams are flat felled.  Because I don't have a felling foot, I make the seam on the inside of the garment.  After the seam allowance is pressed over I like to baste it in place.  I then turn the shirt right side out and topstitch 1/4 from the seam using my presser foot as a guide.  The basting holds everything in place and I don't end up with any bunching up of the seam.  


I had to do a little pattern making today.  This shirt carries a 2.5" hem.  If I had kept the bottom edge of the shirt straight it would have been very simple.  But because I curved the fronts I was worried that the hem would be a big mess.  So I decided to make shaped facings for the lower edge of the shirt.  My Swedish tracing paper made this very easy to do.  Here I've just placed a scrap over the front pattern piece and with my hip rule I've duplicated the curve.  There will be some extra bulk at the lower edge but the inside of the shirt should be neater.  That's a trade-off I'm willing to make.  


So here's one of the new facings. The left and right fronts are different sizes so they require their own facings.  I also write instructions to myself on them, namely which side has to be up when cutting.  I was really short on fabric and had to scrounge for scraps.  Thankfully, the facings don't have to match anything.  


Here is the whole shirt ready to have the collar and facings attached.  I pinned and then basted (of course) everything together.  The entire perimeter of the shirt was stitched and then all the seams were trimmed.  This is a good place to stop for today.  


Tuesday, February 21, 2012

Moving along. The Cocoa Beach Shirt


Readers, I'm postponing the photo shoot for Victorian shirt #2 until next week.  I desperately need a haircut which can't happen until the 27th.  I know the post is really about the shirt,  but  looking the way I do, I'll want to crop my head out of every shot.  Please bear with me.  

In the meantime, there's another shirt to make!  McCalls 7590 from 1964.  


I'm affectionately calling this the Cocoa Beach shirt.  There's so much to love about this pattern.  The back pleats extend all the way to the hem where they're buttoned in place.  There are also button tabs on the sleeves.  I'm intrigued by it's short boxy shape. I've never worn anything like this.  Oh, and I'm always a sucker for a pattern with a pipe in the illustration.  I'll be making the short sleeved version out of this block print cotton voile.  I love the colors.  There may even be a block of Tangerine Tango in there!  


I regretted not starting with a sloped shoulder adjustment on the Victorian shirt.  It just prolonged the fitting of the muslin.  This time I'm just jumping in.  Let's face it, my shoulders aren't miraculously going to square up!  This is my pattern from Peter's MPB shirt sew-along laid on top of the Cocoa Beach pattern.  I'm just going to make this adjustment and hope for the best.  I think this is called "winging it". 


So here we go.  Muslin #1.  On the positive side, the sloped shoulder adjustment worked perfectly.  Yay!  On the down side, the shirt is too short at the center front.  Clearly my body isn't  exactly like the tapered mannequin that this pattern was designed around.  My, ah-hem,  "protuberance" is causing the shirt to ride up in the front.  


This side view shows the problem more clearly.  The shirt should appear straight across the bottom edge all the way around.  


The back, on the other hand, is looking good and boxy, which I feel is important to the design.  My fabric will only reinforce the angularity of the style. 


So here is adjusted muslin #2.  I dropped the center front down 1.5".  Then I drew a curve from the center front  up to the side seam.  The shirt now appears to be horizontal at the bottom edge, although it really isn't.  I'll have to watch the horizontal lines of my fabric while I'm cutting to keep the curve as disguised as possible.  I'm satisfied with the fit at this point and I'm anxious to get it cut out.  

Wednesday, February 15, 2012

My worst day of sewing ever!

Today was one rough day for Victorian shirt #2.  It hurts just to think of it.  Things actually started out well, but spiraled out of control.  


I drafted a pattern for the doubled back cuff based on an idea from David Coffin's book.  The cuff flairs out a bit from where it attaches to the sleeve.  Things were moving along well.  The cuffs were cut, interfaced, attached and I was ready to edgestitch them.  While edgestitching I suddenly felt a lump in the cuff.  A piece of fabric that I had trimmed from the seam ended up inside the damn cuff.  I had to rip out a bit of the cuff seam and fish out the piece of fabric. Little things like this can really make me come unglued. I fixed the problem and regrouped.   


With everything edgestitched I moved on to the buttonholes.  13 of them.  I'm not superstitious but after today I may be.  Things were moving along when......8 buttonholes into the process my ancient Singer buttonholer stopped working.  Holy crap!  What do I do now!  

For those of you unfamiliar with these devices they "wiggle" the fabric back and forth while stitching.  Suddenly I wasn't wiggling anymore.  I never dreamed I'd be taking this contraption apart, but that was my only alternative.  


So here are the guts of a Singer buttonholer.  I'm no mechanical engineer, so it took me awhile (more like forever)  to figure out what goes on here.  


This is the center of the action.  The part on the left that looks like a bird's beak is attached to the shank of the machine.  As the shank moves up and down the ratchet behind it pushes the cogged gear.  This in turn produces the much needed wiggle. The problem was that the ratchet wasn't quite connecting to the gear when the needle was at its lowest point.  It took me forever to figure this out, and I won't go into all the gory details.  If you have one of these gizmos, be sure you have a 1/8" allen wrench.  'Nuf said. 


I kept struggling to get a damn buttonhole made.  Here are some of my attempts.  Needless to say there was a lot of foul language.  After about 2 hours I finally got the damn thing to consistently make a buttonhole.  I made the final 5 buttonholes and was holding my breath the whole time.  


There was one bright spot to the day.  My baltic amber cufflinks arrived from Moscow this afternoon.  Thank you Etsy for restoring sanity to my life! 

Victorian shirt # 2 is now finished.  I hope to post some photos next week.  I hope you all have easier sewing than I did today.  

Tuesday, February 14, 2012

Sewing between chapters of The Count of Monte Cristo

Readers, my Christmas gift to myself this past year was an Amazon Kindle.  There are some features that could be improved, but I can honestly say that I totally love it.  For the past couple of weeks I've been reading the unabridged version of The Count of Monte Cristo.  Hands down this is the most fun I've had reading since the whole Harry Potter series.  I was basically aware of the part about tunneling out of prison, but it's SO much more than that.  I can't recommend it enough.  Just beware, it will impact your sewing projects.  I've been working on Victorian shirt #2 between chapters.  "Ok, I'll pin on the collar and then I can read a chapter."  "Ok, I'll baste the collar and then read a chapter."  "Ok, after sewing the collar I'll read a chapter."  You get the picture.  


The sleeve plackets were a walk in the park after having dealt with the front bib and placket construction.  Because my shirting is very fine, I've decided to go with a full doubled back 
French cuff.  Of course this means searching for cufflinks!  These little guys came in the mail yesterday.  They're little green pearl buttons, although they don't photograph that way.  


Cute, vintage and cheap.  Only $3.99!  


I seem to be forever altering  this pattern.  The original pattern, shown at the top, has a one piece collar that folds over.  It's easy to make, but at the same time kind of unsubstantial.  I've decided I'd rather have a two piece collar with a seam at the top edge.  This should add some much needed body to the collar.  Below the original is my new collar pattern.  I lowered the front neckline when I increased my sloped shoulder adjustment.  As a result the collar needs to be 1/2" longer.  You can see where I cut and taped in little sections of paper.  At the bottom of the photo are my new collar pieces, one of which is interfaced. 


The neck edge is staystitched and clipped.  In addition to pinning on the collar, I also take the time to baste it below the staystitching.  This helps avoid any little gathers that will just have to be ripped out and re-sewn.  Oh, how I hate that!  


It's finally starting to look like a shirt.  Now I can go read a few more chapters!  :)


Sunday, February 12, 2012

Victorian Shirt - Round 2. Simplifying the placket?

I'm really pleased with how the purple Victorian shirt turned out.  There are still some things, however,  that could use some tweaking.  I think while the construction is fresh in my mind, this is the time to make another.  So here goes.  


My major goal with this version is to simplify the front bib and placket construction.  Using David Coffin's shirtmaking book, I'll enlarge his pattern for a sleeve placket and through some sewing origami turn it into a center front placket.  Easy, right?  Oy, what a mindbending exercise.  I laid the bib pattern piece on some graph paper, established a center line and sort of worked my way out from there.  I think I had to go back and revise it twice.  Victorian shirt #3 (if there ever is one) should be much easier as a result of this exercise.  


My fabric is a very finely woven cotton from Italy.  I cut the bib sections on the bias and I'm concerned that the vertical stripes of the shirt front will show through when the bib is layered over the front.  Then I'll have all kinds of crisscrossing stripes.  To minimize the transparency I've lined the bib sections with some very lightweight batiste.  I attached the batiste with a 1/2" seam, turned and pressed the bibs.  Problem solved.  


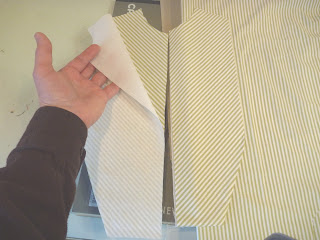
Here the lined bib sections are basted to the shirt front.  They butt over the center front.  The placket piece is attached to the inside of the shirt, the front center is slashed and the placket is pulled out to the front of the shirt.  This is where I panicked.  I was completely befuddled by what was inside, outside, right side, wrong side.  So.....


To play it safe I experimented with a fabric that had a clear right and wrong side.  Success, I have a placket that folds left over right.  


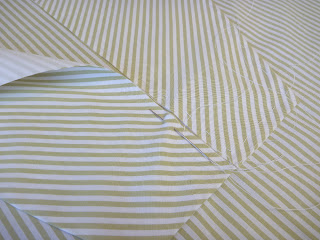
Here is the completed bib and placket.  Unfortunately the stripes of the placket didn't exactly line up with the stripes of the shirt.  I'm off by about 1/8".  Shucks.  On the plus side, this construction has eliminated the unflattering center box pleat that the original pattern has.  I think that trade-off is worth it.  

This, I believe, wraps up the most difficult part of this shirt.  The rest should go together easily.  Fingers crossed!  

Monday, February 6, 2012

Great stuff in the mailbox

You know it's going to be a great day when you find 11 yards of fabric crammed into your mailbox!  


Denver Fabrics was offering free shipping, so I figured it was a good time to pick up more shirting fabric.  I probably saved about $13.  Admittedly, DF doesn't have the greatest photos on their website, so I was holding my breath as I ripped open the package.


Yay!  No huge disappointments.  


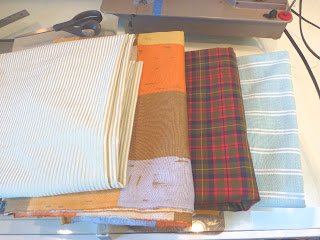
So here's my haul.  From left to right.  First is a very fine cotton shirting in celery and white.  It has a wonderfully silky hand.  I'll use this first and re-make the Victorian shirt with a few more alterations.  

 
Next is a block printed cotton voile.  I had no idea what voile is, but I liked the print and the colors.  This turns out to be my least favorite of the batch.  The weave is quite coarse, like a cheap muslin.  I hope it softens up with a good pre-washing.  Still, I love the colors and think it will make a fun summer shirt.  


Next is an olive and red tartan.  This is a substantial fine twill weave.  Nothing flimsy about it and well worth $4.95 / yard.  


Lastly, a light teal and white oxford cloth.  This is a color that I look particularly good in.  I plan on making a basic button down from the pattern that I used last year for the MPB shirt sew-along.  


Oh, but there's more than just fabric in the mailbox!  This amazing shirt pattern is dated 1964 .  Thank you Sassy Cotton for finding this gem.  I'm planning on using the voile for this one.  I especially love the back view with the pleat and button detailing.  There is also a button tab on the short sleeve.  I just love this kind of detail, and it's what keeps me wanting to make my own clothes.  


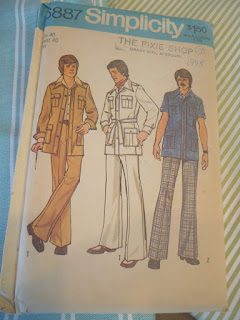
OK.  Now dial the "way-back machine" forward to 1975.  This pattern is also from Sassy Cotton.  If you love vintage patterns I hope you will check out their Etsy shop.   My other recent source for great patterns is Wheeler Salvage.  Mary has a great selection of very stylish stuff.  I could (and DO) look at vintage patterns for hours!  

I really think this whole safari look is ready for a resurgence.  Do you?  Should there be a Summer Safari Sew-Along?  


Here is the celery stripe with my brocade vest.   My plan is to launch into a second version of the Victorian shirt.  This time I hope to simplify the construction of the front placket by making it just a larger version of the sleeve placket.  I guess time will tell if that works out.  If I have enough fabric I hope to place the bib on the bias.  


Lastly, I'm thinking the tartan would make a most excellent tuxedo shirt.   I'm not sure how the pleats work, but it could be very interesting.  

That's it for now.  It's nice to have projects in the pipeline again.  

Thursday, February 2, 2012

The Victorian shirt.....fini!


It's a wrap.  The Victorian shirt,  Folkwear #202, is done.  I'm sorry for the poor quality of the photos.  It was a very dreary day here in Maine, so the combination of low light and a very dark purple shirt made it difficult.  

Still, wearing this shirt makes me feel like a king!  The fabric has wonderful heft and a fluid drape.  The color I adore.  The cufflinks are fun and give me a reason to haunt Etsy for more. But most importantly, it really fills a gaping hole in my wardrobe.  This is the shirt I need to wear to a party or, God willing, out on a date.  


The single French cuff is from David Coffin's shirtmaking book.  It's not as bulky or ostentatious as the doubled back variety, which really needs to be worn with a jacket in my opinion.  This option lets a guy have a little fun with his clothes without looking stupid.  Trust me, we care about that stuff.  I added one of the little glass buttons to the placket to hold it shut.  A little detail that actually serves a purpose.  


There's some interesting construction with this shirt.  The placket formation ends up producing a box pleat below it.  I'm no spring chicken and I have a bit of a belly.  The combination of a box pleat forming just below the sternum and a belly isn't exactly a good thing.  Think maternity wear.   To keep the pleat under control I stitched it "shut" below my belt line.  I would suggest this to anyone who isn't going to be wearing this as a nightshirt.  


I'll be hearing confession in the kitchen in 15 minutes!  


When the occasion calls for pulling out all the stops I can add my shawl collar brocade vest.  Now it's a party!  


It's also the perfect way to sport the gorgeous steampunk pocket watch that my daughter gave me for Christmas.  

To recap, here are all the changes I made to Folkwear #202 

1. I shortened it by 4 inches, and next time will shorten it by 5.  I truly think this pattern was designed for women to wear as a tunic or dress.  

2. I shaped the back and consolidated all of the pleats into a center box pleat. 

3. I did a sloped shoulder adjustment.  It could use just a touch more I think, but I would definitely have to lower the neck opening for that.  

4. I added a sleeve placket (with a buttonhole) and again reduced the number of pleats.  

5. I redrafted the cuff to accommodate cufflinks. 

6. I moved the "x" topstitching from the placket down below the waistline to control the front box pleat.   

Thanks to everyone who made this project possible!  


Credits: 
Olive wool trousers   Jos A Bank 
Charcoal wool trousers  Brooks Brothers 
Fragrance  Boucheron pour homme