Monday, May 21, 2012

Happiness is..... The completed safari jacket!


All the loose threads are clipped.  All the buttons are sewn on.  The sun is shining so it's time to get outside and model the circa 1975 safari jacket.  


I'm a happy guy in my new safari jacket!  
Simplicity 6887 with a few modifications here and there. 


The pattern had a HUGE disco collar that I whittled down.  I also replaced the button cuffed sleeves with a two piece vented sleeve.  


The undercollar , back vent and sleeve vents have contrasting fabrics.   


Here you see the patchwork madras at the collar and back vent.  


I know a lot of people think "ick" at the idea of a safari jacket, but it really turned out more like a mini trench coat in my opinion.  It's a versatile color for me and goes well the the purples, olives, aqua and peach that make up the bulk of my wardrobe.  I'm not totally thrilled with the set of the sleeves, but for a casual jacket it's OK.  There's a substantial amount of lycra in the fabric which just doesn't want to "relax" no matter how much I press.  It's been a good lesson learned and I'll keep it in mind when shopping for fabric in the future.  

I'm going to be putting the sewing machine away for a bit while I work on building a backyard fountain.   Happy sewing to all of you!  

Monday, May 14, 2012

Safari -- A whole lotta hand sewing!

We've had some pretty miserable weather recently.  So it's been a good time to stay in, watch season 2 of Downton Abbey and do a ton of hand sewing.  So here's a glimpse of what's going on with the safari jacket.  


This is a hemming technique from my old pal Edna Bishop.  Parts of it are a PITA, but the end result is worth the effort.  The jacket hem is 1.5", so a 2" wide bias strip of muslin is tucked down inside the hem.  The two pieces of fabric are then stitched together with a 1/4" seam.  I find it easiest to baste first (of course).  I only have one foot for my Singer 310, so the 1/4" stitch requires me to pass the whole jacket through the middle of the machine.  It's cumbersome, but possible.  


The jacket fabric is folded back and hemmed into the muslin using loose 1/2" stitches.  The hem will be virtually invisible from outside the jacket.  


While I still have access to the inside of the coat I tack down the edges of the patch pockets.  I don't know about you, but I hate the "flaps" around pockets that have been stitched on with 1/4" topstitching.  The time spent on this next step is worth it to me.  Working from the backside of the jacket I make diagonal stitches around the pocket.  I can feel with my non-sewing hand where the edge of the pocket is, so these stitches move along quickly.  Sometimes I "go too deep" and a little stitch will show on the front.  I just clip it out and throw in a few more stitches.  It's all covered up with the lining, so no one has to know. 


I refer back to my Roberto Cabrera tailoring book when it comes time to do the back vent.  I always feel that I'm just muddling along.  (Which I am!)  The right half of the vent is easiest to deal with.  The center back seam of the lining just continues down the back flap very close to the edge.  The other side is always a challenge.  I work the lining across the bottom hem starting at the jacket front.  As I approach the vent it becomes clear what has to happen.  I just keep pressing and basting until it works. 


Here's the completed vent and lining. 


I like to finish it off with pick stitching.  


I want some of the contrasting sleeve vent to show.  So I've opened it out slightly and basted it into position.  The sleeve lining, and to some extent the button,  will hold the vent open.  


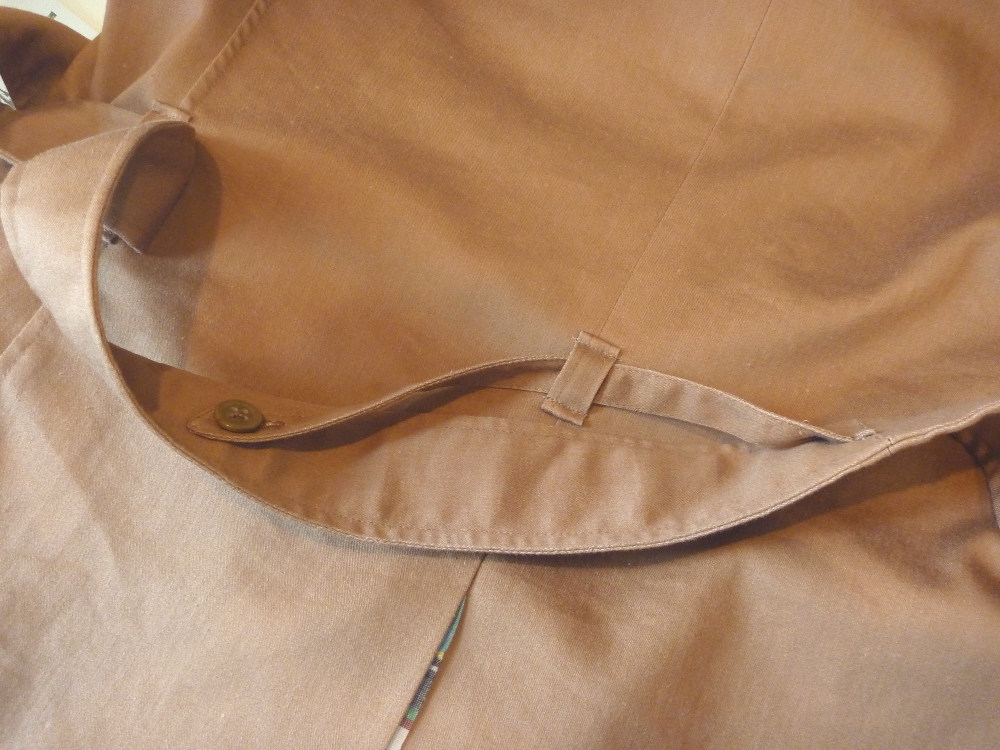
This is a little belt restraining strap that prevents the belt from being separated from the jacket.  The Japanese trench coat has this feature, so I duplicated it here.  Now all that's left is to sew on the buttons and clip all the loose threads.  Hopefully I'll be able to model the finished jacket next week.  

Tuesday, May 8, 2012

Safari -- The odds and ends post

This is sort of a catch-all post.  The outside of the coat is essentially finished, as is the lining.  Time to put the two halves together.  


There is hardly any interfacing in this jacket if one follows the directions.  Basically there are only  2" wide strips down the center front bands.  Not much structure to be had there.  So I'm borrowing a page from one of my old standbys --  The Bishop Method of Clothing Construction by Edna Bishop.  A hair canvas interfacing is cut using the front facing pattern piece.  It's cut 1/4" wider than the pattern and is then freehand cut to flair out to the shoulder width.  This creates an interfaced panel over the upper chest.  A muslin interfacing is cut for the back that continues the curve.  Once it's all assembled at the shoulders the interfacing is basted to the wrong side of the lining.  


This is a step I almost forgot!  The epaulettes are basted across the shoulder seams.


Now is also a good time to add a hanger loop.  It takes only a few minutes to make one and baste it into position on the inside of the lining.  I skipped this step on my frock coat and have regretted it ever since.  


The collar is pinned and then basted into position.  All of the edges have been staystitched and I clipped both the neck edge and the collar about every inch.  This makes the collar much easier to attach.  


The lining with its attached interfacing is then flipped to the outside of the jacket so that the collar is sandwiched in the middle.  


Then I baste the hell out of everything as usual.  There are 6 layers to sew through here.  9 when I stitch over the epaulettes. 


Even with all that basting I still ended up with a little catch!  Grrrrrr!


The collar is trimmed out of the seam VERY CAREFULLY.  This is no time for a slip up!


I also trimmed away the interfacing.


While I still have access to the inside of the coat I added a sleeve head.  It's a 1.5" wide strip of bias cut wool sewn over the cap of the sleeve.  I experimented with both a single and double layer.  The single layer worked best.  The edge of the wool is aligned with the sleeve seam allowance and handstitched very close to the seam.  The goal is to "fill out" and improve the "fall" of the sleeve.  The result isn't stellar, but I keep telling myself that it's better than nothing.  

From here on out it's mostly hemming and handsewing the lining, which I actually enjoy.  

Thursday, May 3, 2012

Safari -- The lining


Simplicity 6887 is for an unlined jacket, but making a lining isn't all that hard and will really improve the wearability of this jacket.  I just need to prepare myself mentally for working with polyester acetate, which must have been invented by the devil.  


I'm using a lightweight lining that's been in my stash for almost 2 years.  I bought it in a fabric dive on W 35th St. with a certain celebrity sewing blogger who has a strong dislike of heavy linings.  It was intended for a fall coat (the purple coat), and after getting it home and prewashing it, I decided it was just too wispy for my Maine climate.  So it's been sitting in a bin ever since.  

It's an iridescent brown / blue and will be perfect for this jacket.  


This jacket has a back yoke, so I'm making the lining yoke out of some leftover oxford cloth.  I'm hoping this will beef up the shoulders a bit, plus I just like the contrast.  Both the back yoke and back sections are cut an extra 1" wide to allow for a center back pleat.  


Extra fabric is cut onto the sleeve sections for wearing ease.  This is a technique I learned from the Japanese coat book.  It adds extra ease to the armpit area and prevents rip outs.  I'm not too precise about it.  I just mark an extra 1" to 1.5" with chalk and cut.  Everything eventually gets eased into place. 


After much slipping and sliding of fabric (and cursing) I end up with this.  I have a few details to attend to on the  outside of the coat, namely making and positioning the belt loops.  Then I will tackle attaching the lining and collar.  

Wednesday, May 2, 2012

Safari -- The sleeves

I spent the better part of a day working on the sleeves.  I knew after making the muslin that they were going to take some effort to do well.   


My plan has been to add some contrasting fabric to the sleeve vents.  I extended the stitching line of the undersleeve vent and pinned a scrap of oxford cloth along the line.  The stitching line is faintly marked with blue chalk on the right above.  After stitching, the oxford cloth is pressed over the vent extension, trimmed and basted into position.  


I pulled out my copy of Roberto Cabrara's menswear tailoring book to complete the sleeve vents.  A 5" wide piece of bias cut muslin is basted to the bottom of the sleeve along the foldlines.  It's held in place by stitching it to the seam allowances in the middle.  I slide a metal ruler in under the seam allowance so I don't pick up any fashion fabric when I make these stitches.  


Using the basting as a guide the cuff is folded up and a mitre is formed at the uppersleeve vent.  This potentially allows the sleeves to be lengthened, although I don't expect my arms to be growing!  The fashion fabric is hemmed into the muslin.  I slide my fingers in behind the muslin to prevent catching the fashion fabric.  I serged the edge of the undersleeve to save some time.  I'm sure Roberto would be appalled, but this is just a casual jacket after all.  


Here is the completed vent.  I will probably secure it with a single button so that a hint of the contrasting fabric will be visible.  


Oy!  talk about easing.  I think this shot shows just how much sleeve fabric has to be eased into the armscye.  


After pinning the sleeve in place I baste around the whole mess twice taking a generous 1/4" stitch.  This is another helpful tip from Mr. Cabrera.  Once the sleeve is basted in place all the pins can be removed.  I find this makes the actual sewing much easier.  Less finger pricking!  Plus, the basting practically eliminates the possibility of making a little "catch" somewhere  that will have to be ripped out.  


Here is the jacket so far with its sleeves attached.  I'm counting on some interfacing and  substantial wool sleeve heads to give it some much needed shoulder structure.  Fingers crossed.  


The collar is also finished.  It's interfaced with bias cut hair canvas.  The under collar is bias cut patchwork madras.  The next step will be to construct the lining.  (A step that I usually hate)  

Tuesday, May 1, 2012

Safari -- Givin' it hell for a day


I don't know about you, but I really hate being dragged away from my projects.  The safari jacket has been dead in the water for over a week now due to some family commitments and work.  While I was away I would mentally "work" on it, thinking through the construction of the pockets and vents.  So it was really nice to get back home and spend a day really going at it.  


If you follow this blog you already know that I'm a baste-a-holic.  The position of the pockets was established with tailor tacks during the cutting out stage.  For once they stayed in, and they were a huge help in maintaining the symmetry of the fronts.  The pressed under edges of the pockets were basted into place first.  Then each pocket was basted onto the front, close to the edge where it wouldn't interfere with the 1/4" topstitching. 


Here's the flap with it's stitching line marked with orange chalk.  I basted on both sides of the mark and then stitched it in place.  The seam is then trimmed close to the stitching, the flap gets pressed down and  1/4" topstitching keeps it in place.  


4 pockets later the fronts are done.  Yay!  


I've inserted a piece of patchwork madras at the back vent just to jazz things up a bit.  I plan on doing something similar with the sleeve vents.  


Finally, something that will go on a hanger.  This is always a satisfying moment.  Now it's on to the sleeves!