Thursday, August 25, 2011

Ix-nay on the longer trench


Although I would have like a longer coat, in the end it just wasn't possible.  In fact, I struggled for hours to get the coat as drafted out of my limited amount of fabric.  Above you can see how close I had to place the major pattern pieces.  Thank God the fabric was 60" wide.  


The sleeves, storm flaps and collar pieces had to be orchestrated by trial and error onto the remaining fabric.  The bias cut undercollar turned out to be an impossibility, so it will be in two pieces.  The undercollar has lots of decorative topstitching on it, so I don't think the center back seam will be an issue.  


Somehow I managed to get the smaller pieces ( pocket welts, epaulettes, belt loops, cuff straps) out of this table full of scraps.  

So, as much as I would have liked a longer coat, I'm sucking up my regrets and moving forward. Needless to say a valuable lesson has been learned.  All of this could have been avoided for $8 !  

Saturday, August 13, 2011

The trench coat muslin and a question


The muslin for the trench coat is complete, so here I am with the first fitting.  Overall I'm pleased with the fit.  Why the sleeves are so long I haven't a clue.  I can safely shorten them by at least 2".  The extra 3/4" across each shoulder will allow me to wear this over heavier clothes.  In these pics I'm wearing a lightweight fleece with some room to spare. 


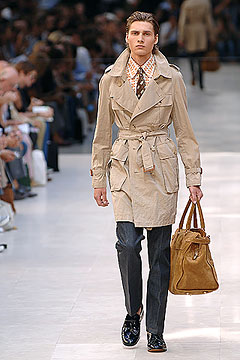
I don't know if anyone really belts a trench coat.  More often than not I see the belt just hanging at the sides or doubled back and fastened behind.  I wrapped a belt around myself just to get the visual gist of things.  In all honesty I'm not 100% sold on the proportions.  The belt seems to bisect the coat right in half.  Am I wrong in wishing the coat were longer?  Feel free to weigh in on this one.  


Here's a closer shot of the collar.  I have to admit that the "engineering" of these Japanese patterns is superb.  The collar, collar stand and front facings aligned perfectly.  Usually I struggle to get one part or the other to match up.  Hopefully the real collar will go together as easily as the muslin.  This is one of those cases where making the muslin is well worth the time and effort.  I'm going to be lining this coat and with some careful engineering I should be able to attach the lining, facing and the collar with a single seam.  At least that's the theory right now.  

Because of my concern over the coat's length I've done a little trench research.  This is an Aquascutum model.  It's length from neck to hem is advertised as 94 cm , or 37" .  My coat is 37.5 inches, so apparently I'm in the ballpark.  BTW the coat above is $720.  I think I can come in under that.  

 
This is a Burberry trench.  Again the back length is 37".  A similar model is available on Bluefly for $1596.  Seriously????  The Brooks Brothers model varies from 38 to 40" in length.  Dear readers, what's your opinion?  Should I try to eek out a little more length?  I'm unfortunately very tight on material, so it may not even be possible.  Is it worth the struggle to add just an inch or two?   


Thursday, August 11, 2011

Getting back to my roots


Ok.  Getting back on track here.  I've decided to make the cover trench coat from the Japanese coat book.  It's been while, and I have to admit that it's been easy to drift into pre-printed patterns.  It's been a treat to open up an envelope and, VOILA.... a pattern and instructions in English.  But I have all the materials to make the trench coat, so it only makes sense to move forward with it.  Plus it would be really nice to have this coat for fall.  


For those of you not familiar with Japanese patterns, the book above is sitting on the pattern sheet.  All the pattern pieces are overlapped onto a single sheet.  It's like finding the hidden pictures in the kid's magazine Highlights.  Hmmm.  where's the collar stand?  


Once again I'll extol the virtues of Swedish Tracing Paper.  Here I've rolled it out over the pattern sheet.  It's translucent and very durable.  


I find a pattern piece to trace and pin the tracing paper onto the pattern sheet.  It's a good idea to let your eye follow the shape all the way around before tracing.  There are so many intersecting lines that it's very easy to get mixed up and get off track.  It's best to know where you're headed.   None of the pattern pieces include seam allowances or hems.  I use a small ruler and make little dashes all around the pattern piece at 5/8" with a pencil.  Then it's just a matter of connecting the dots.  Easy but tedious.  I've learned from my previous 2 coats that the Japanese size XL isn't even a size M by American standards.  I was able to alter this pattern during the tracing process.  I increased the shoulder width by 3/4".  This ends up giving me an additional 3" in circumference of the coat.  


Jumping ahead, the sleeves ended up being about 2" too long on the muslin.  The tracing paper makes this an easy adjustment to make.  I simply take up a 1" fold while at the same time maintaining the grain line.  A little piece of tape and it's done.  


Here you see the fold taped into place.  The pencil line is the grainline which must be maintained.  The worst is truly over at this point.  On to making the fitting muslin.  

Thursday, July 28, 2011

Lazy summer days and too much ETSY

I fear my blog is seriously derailed.  I'm supposed to be working myself through the remaining 2 designs in the Japanese coat book (a pea coat and a trench), but I found myself totally sucked into ETSY the other day.  Here are the damages! 

This pattern was a ridiculous $3, and the size Medium is already cut out.  It's from 1978.  I really need to find some nice white shirting for this one.  I'm sure it will be quite voluminous, so I'll need to make a muslin and figure out how to pare it down.  I'll break out my My Fair Lady vinyl and pretend that I'm Henry Higgins.  

Of course the pipe totally sucked me into this one!   I really needed a pajama pattern and this was one of the more unique ones that I found.  I'm intrigued by the collar / placket in version A.  But, truth be told, I probably won't ever make it because I prefer to sleep in a t-shirt.  I'll definitely make the bottoms and a coordinating robe in flannel for the winter.   Hey, what about the trench coat?

Oh boy, this was billed as a Member's Only jacket.  That sure grabbed my attention.  Actually, as you can see, it's by J G Hook and dates from 1985.  I'm not sure if  J G Hook still exists.  My assumption is that they've been eclipsed / swallowed up by the likes of Polo and Hilfiger.  I guess I'm old enough that this kind of fashion is very appealing to me.  I'm just not 100% sold on the epaulettes. 

I have about 5 yards of this wool glen plaid.  I used this as the contrasting collar on last year's purple fall coat.  I think it will be perfect for this jacket.   The next time I'm in NYC I'll be shopping for 15 buttons and a yummy lining for this.  Hey, what happened to the pea coat? 

Lastly, is this faux Hudson Bay blanket from LL Bean.  I'm toying with the idea of adapting the bathrobe pattern from my last project into an overcoat.  I picture it fastened closed with a couple of huge bone toggles through big bound buttonholes.  OMG I'm so off track here.  Maybe I need a new title for my blog.  

Thursday, July 14, 2011

The finished seersucker robe

Here I am lounging on my porch in my new summer bathrobe.  Yay!  This version features the plain shawl collar.  I shortened the length by 3" which allowed me to cut the robe out of 4 yards.  It was a pretty tight fit with hardly any scrap left over.  I did manage to match the stripes on the patch pockets.  

I think this shot shows the fabric's texture well.  The color also coordinates very nicely with my porch furniture.  

Of course the look isn't complete without the pipe!  Needless to say I'm totally in love with my new summer robes.  This pattern was a joy to work with, right down to the font that was used on the pattern tissue.  There was even a separate pattern piece for the front interfacing, how quaint.   The robe also features a two piece sleeve, which is unheard of on any bathrobe that could be purchased today.  In fact, with just a little tweaking this could easily be a winter coat.  Hmmm.  Maybe there's another project brewing.  

Wednesday, July 13, 2011

Before there was "one size fits most" -- The 1958 Men's Robe


I've been in need of a new summer bathrobe for years.  The one I have is disgusting.  A gray and tan seersucker (how depressing), hopelessly stained from a self tanning experiment gone terribly wrong.  I found this great vintage pattern on Etsy.  McCall's #4816 circa 1958 in size 38-40.  I was totally sucked in by both the notched collar detail on the blue version and the pipe!  


I was lucky to be in NYC in early June and dropped by what has become my "go to store" in the garment district, H&M Fabrics on W. 35th St.  They had bolt after bolt of cotton / lycra seersucker for a ridiculous $2 / yd.  I picked up both a  lavender and white stripe, and an aqua and multi color stripe.  Throw in a spool of thread and you have a new bathrobe for about $10.   


I won't go into a lot of the construction details.  Coming off the tailored "wedding jacket" this was a refreshingly simple project.  The curved patch pockets were pressed into shape using a template cut from an empty Cheez-its box.  


This pattern pre-dates fusible interfacings and calls for cambric.  I have absolutely no idea what cambric is, so I interfaced the collar and facings with white cotton from a Goodwill king sized sheet.  I've learned that thrift store sheets are an inexpensive source for muslins.  My king sized sheet was only $2.99.  It was perfect for interfacing a summer robe.  


The notched collar was marked out with chalk on the interfaced collar.  


 And here it is stitched.  The notch is then slashed up to the point before turning the collar.  Unfortunately I don't have any pictures of the finished lavender robe.  You'll have to trust me that the notched collar came out great.  The pattern calls for all the seams to be flat felled.  I did the felled seams at the shoulders but serged the rest of the seams.  I sewed the bottom hem by machine and hand stitched the facings in place.  Then it was on to the aqua robe.  

Tuesday, June 14, 2011

The finished coat and lobster rolls


Hard to believe, but the wedding has come and gone.  I finished the coat with plenty of time to spare.  Thanks to my daughter for helping with the photo shoot.  The location is the lovely Juniper Hill Inn in Ogunquit, Maine.   


I truly enjoyed wearing this jacket.  All the other men at the wedding were wearing dark somber suits, so I'm sure I really stuck out.  Usually that would bother me because I'm not the most self confident man.   But I felt truly happy and joyous wearing this jacket, and shouldn't the clothes that we make for ourselves do just that?   I love the color (which my camera never quite captured correctly), and I'd like to think that I added a little upbeat flair to the event.  


I've put Roberto Cabrera back on the bookshelf, and the jacket is hanging in the closet.  Like all of my sewing projects this has been deeply rewarding.  I loved working with real tailoring materials; the various types of canvas, twill tape, pocketing, sleeve heads.  Even my new tailor's chalk was a pleasure.   My work space, which is very tiny, is all cleaned up waiting for the next project.  Until then, enjoy the lobster rolls!