Showing posts with label laughing moon mercantile #109. Show all posts

Thursday, November 3, 2011

Frock coat finale!

The Victorian Frock Coat with Shawl Collar Brocade Vest


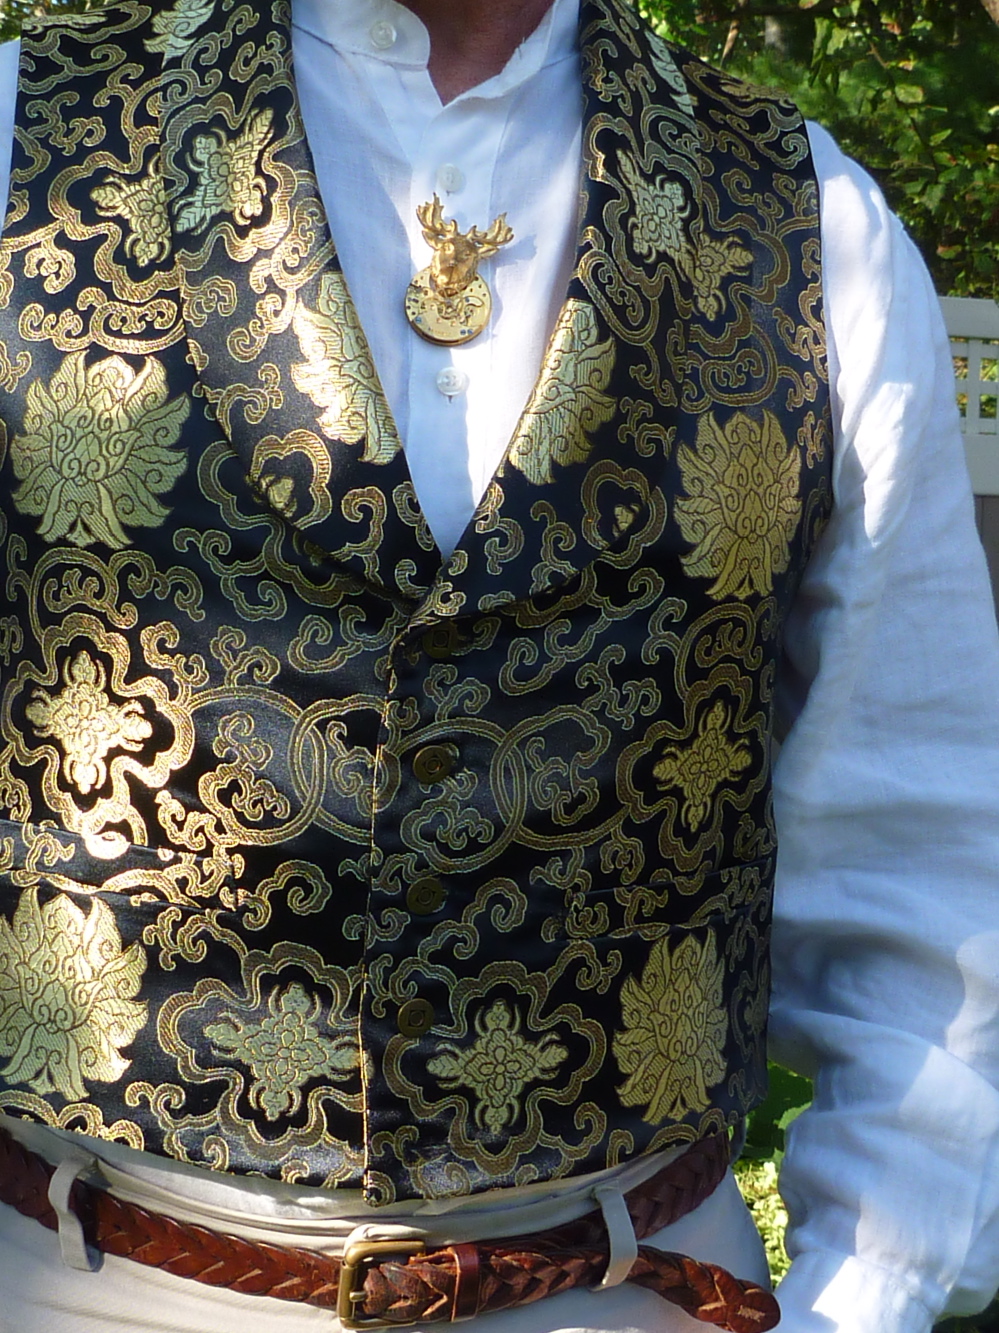
A single breasted frock coat in brown wool herringbone.  Worn over a polyester brocade vest of black, bronze and gold.  Both garments fastened with antique brass buttons.  Pattern by Laughing Moon Mercantile #109.  


A day in the country or a day at the grocery store.  It's all GOOD in a fabulous coat like this! 


Buttoned up with just a hint of the vest showing.  


And here is the back detail with shaped seams, buttons and full length tails. 
 I've been wearing this coat for a couple of days now and totally love it.  It was a challenging project (aren't they all) and I had to alter the pattern quite a bit, but I believe my efforts were all worth it.  I love Fall, and having a coat like this somehow lessens the painful reality that Winter will be here before too long.  

No rest for the weary, however.  I'm launching immediately into the Japanese pea coat, and get this.....  I'll be doing it as a sew-along with one of my blog followers from Gloucestershire, UK!  She's traced the pattern and made the muslin, so I have some catching up to do.  If anyone else has the book and wants to play along don't be shy.  

The frock coat. Down the home stretch


What the hell is going on here, you may ask?  This is the shoulder pad being pad stitched into the chest canvas.  While these stitches look huge, only a small amount of the canvas is caught with each stitch.  It's at this stage that the Cabrera book really starts to get confusing, so in a way I feel that I'm just winging it here.  I believe the goal is to have the shoulder pad anchored only to the chest canvas so that the outer fabric is able to move freely over the pad.  Makes sense to me.  I'm just never sure what to do with the part of the shoulder pad that extends to the back.  There's no canvas, so I just leave it unattached past the shoulder seam.  So far I've never had a shoulder pad fall out.  


Here a sleeve head is sewn into the seam of the armscye at the uppermost cap of the sleeve.  These were purchased at Steinlauf & Stoller.  However, they can be easily made with a couple of wool strips cut on the bias.  The function is to "fill out" the top of the sleeve so that there is a smooth drape.  


This is a felt undercollar that will be handstitched  to the collar.  You can see where I've basted the roll line and I've pressed it into shape over my tailor's ham.  BTW if you don't have a ham I highly recommend getting one.  You'll be surprised how often you reach for it.  

I attached the facings and the upper collar in one continuous seam just as I did on the trench coat.  I call it the "Big Seam" and it's a technique that works for me.  

From here on out it's just a LOT of handstitching.   Fortunately, I really enjoy this part of the process.  


Here are a few sneak peeks.  Antique brass "monkey fist" buttons at the sleeve vents.  


Antique brass buttons at the front and on the tails that match the buttons on the brocade vest.  I've really got to get this project finished.  We had snow over the weekend; a reminder that the season for wearing this coat is limited.  I want a few weeks to enjoy it before it has to be zipped up with some moth balls!  

Wednesday, October 26, 2011

Interlining, uncharted territory


After cutting out the lining I held the larger pieces up against the wool to get a feel for the eventual weight / substance of the finished coat.  My impression was that it was a bit flimsy, especially considering that I will primarily wear it as outerwear.  I also hate being cold, so I decided to interline the sleeves and the upper half of the coat.  I referred to my Edna Bishop book on clothing construction for instructions.  I've read discussions on other blogs relative to interlining vs. underlining.  Sewists can be very passionate about this topic!  I'm calling it interlining because it's attached to the lining.  


My real issue was what to use.  Edna suggests using old blankets which would be way too heavy.  I tried an old flannel sheet and even it felt like overkill to me.  I eventually decided to use some of my old white t-shirts.  It would either work or be the biggest sewing mistake ever.  


I cut the pieces and basted them carefully to the lining, making sure there were no huge wrinkles.  After basting, the interlining was staystitched to the lining just inside the seamline.  The knit was trimmed as closely to the seam as possible.  As shown in the above photo the interlining in the sleeves ends at the top of the hem.  This reduces the bulk at the cuff.  I then assembled the lining.  I find it hard to keep my spirits up during this process.  It just feels like I'm making the whole damn coat over again.  


Of course I complicated things even more by adding an inside chest pocket.  


Here's the completed lining.  I added the lower front facings which are interfaced with some strips of hair canvas.  It just seemed odd to have so much structure at the top of the coat and none at the bottom.  


The back view.  


Now I just need to sew this big mess together!  

Tuesday, October 25, 2011

Frock coat progress

I haven't posted any progress for awhile, but believe me I've been hard at work.  I continue to use my Cabrera book as a guide, just using the techniques that make sense for this project.  I decided to add flap pockets on the seam where the upper coat attaches to the skirt.  The pattern as designed only has pockets in the lining.  Two are in the coat tails which I totally don't understand at all.  I borrowed this idea from Simplicity's frock coat pattern (#2895).  It was a tricky little bit of sewing, but worth the effort in the end.  


The completed flap.


A little peek inside.  


Setting the sleeves is always the most difficult part.  This is an instance where I refer to Cabrera.  First, a strip of pocketing is basted around the sleeve opening on the coat.  This prevents any stretching.  The wool I'm using is quite loosely woven and it stretches and frays like crazy.  This extra bit of work was time well spent.  The sleeve is then set by basting with 1/4" stitches.  The seam is stitched with a 1/2" allowance, even if the directions call for 5/8".  I'm glad to report that both sleeves went in on the first shot.  No seam ripping! 


The outside of the coat is finished for now.  Off to the lining.  

Tuesday, October 18, 2011

The frock coat -- back to tailoring


Things are progressing on the frock coat front.  I altered most of the pattern pieces.  Here they are all spread out.  I shortened and narrowed the sleeves, lowered the lapel and increased the back by 1.5 inches.  Again, if you haven't tried the Swedish tracing paper I encourage you to try it.   I'm a true believer.  It's so easy to make alterations with some scraps and a roll of scotch tape.  
Here are some goodies that arrived from B. Black and Sons.  They sell pre-made jacket fronts in in 2 weights of canvas and for both single and double breasted jackets.  These are 2 heavy weight fronts for a size 40.  At $12 for the pair I think this is an incredible bargain.  As much as I enjoyed building and pad stitching the canvas for the "wedding jacket", I wanted to make this project a little easier.  I want this coat to be a cross between outerwear and suit coat.  So I'm pulling the Cabrera tailoring book down off the shelf and picking and choosing which techniques to use.  It's really the beauty of being able to make exactly what one wants, isn't it? 


I also picked up a hip rule and spool of real basting thread that should last a lifetime.  I could wax poetic about the thread but I'll resist.  Just know that it's pure magic to work with.  


Here the front is basted to the canvas in a very specific order.  If you have a touch of OCD you'll love this! 


I decided to add a front chest pocket which is not part of the pattern.  I was surprised at how easy this was to do.  Thank you Roberto Cabrera for this bit of sewing origami!  


This is the real hardcore tailoring, and hopefully the end result will be worth the effort.  Cotton twill tape is stitched to the canvas to define the lapel edges.  The lapel is pad stitched and twill tape is cross stitched over the roll line.  Trust me, there is nothing scary about this stuff.  In fact, it's really fun to do.  Now that the coat fronts are done things should move along quickly.  

Saturday, October 8, 2011

Edwardian frock coat -- The fitting fight

I've launched into the Edwardian frock coat, Laughing Moon Mercantile #109.  As you can see below, there's a lot of work to do.  Eeeeeek!


The size 40 vest fit perfectly so I cut the 40 coat.  Sadly, there's nothing "perfect" going on here.  The jacket fits fine in the front but is way too tight across the back.  The sleeves have also been problematic.  I thought while cutting them out that they looked big, and I was right.  The cuff ended up with a circumference of 14" which is larger than any winter coat I own.   There was also at least an extra inch of ease in the cap.  It was impossible to set the sleeve.   So far there has been so much to dislike about this pattern.  The shoulder seams extend to the back, so from the rear there is a hodgepodge of seams, none of which align with each other.  I'm not digging it. 


Before.....

After....

I let the center back seam out 1".  This has helped, but I still think I could add another 1/2".  It's hard to see but I've also narrowed the sleeve on the left.  I decreased the sleeve seams at the top of the sleeve by 1/4" , gradually increasing to 1/2" at the cuff.  This eliminated the excess ease, made the sleeve seam meet up with the curved back seam and made the cuff more suit like and less overcoat.  The sleeves will need to be shortened about an inch.  


Here is the front as designed.  It calls for 4 buttons down the front.  It's OK, but I have a fabulous vest that's completely covered up.  


I really don't care about historical accuracy, so my plan is to lower the roll line of the lapel so that some of the vest is revealed.  This might require narrowing the lapel and the collar slightly.  Both are easy fixes.  All in all this project is getting off to a rough start.  Making a muslin can be so frustrating, but obviously in this case it's been well worth it.  Next I need to tweak my patterns to match the changes I've made, and prep my fabric using the London shrink method.  


Tuesday, September 27, 2011

The steampunk brocade vest, oh yeah

I've wanted a steampunk wardrobe for almost a year now.  On my very infrequent trips to NYC, I've been collecting the components to make it.  The materials for this vest have been hanging around for months, and I needed a break from the Japanese pattern book.  Deciphering all those diagrams can be exhausting.  To say that I'm thrilled with how this turned out is an understatement.  

If you're interested in making a Halloween costume this isn't your pattern.  This pattern is from Laughing Moon Mercantile  (#109) and can be found all over the web.  There is both a double and single breasted Edwardian frock coat, and 2 vests.  This is vest B which features 2 welt pockets and a shawl collar.  Love! 
If you make this pattern you will definitely want to make a muslin first.  The shoulders were bizarre and required some work.  I also dropped the front of the vest down 1".  The pattern is taken from a historical garment and was intended to be worn with very high waisted pants.  


My fabric is a polyester brocade that was $10 / yd.  This can be found all over the garment district in NYC, and I probably paid too much for it.  It coordinates with a warm brown herringbone wool that I will be making the frock coat with.  It was also a bargain at $10 / yd at the ultimate fabric dive, H&M fabrics on W. 35th St.  
There is a good deal of tailoring involved with this pattern, but the effort is well worth it.  The upper collar is interfaced with hair canvas, and twill tape is hand sewn over the fold line.  It makes for a substantial roll of the collar.  My only issue with the pattern is that the undercollar wants to "fall out".  I solved this by pick stitching the undercollar into the twill tape of the fold line.  Problem solved.  The pattern also calls for topstitching everywhere which I just think looks cheap.  Shawl collars with topstitching are just wrong.  


Little antique brass buttons were the finishing touch.  


The facings really kick the whole thing up a notch.  Do I adore it?  Yes!!!!   Thanks to my amazing daughter Meredith of Oakland, CA for the steampunk brooch.  Now I have something deserving to wear it with.