Sunday, July 15, 2012

The collar -- Saving the hardest till last

I've been back and forth on the whole collar issue.  Collar? or just a band?  Since both my Victorian shirts have only collar bands I decided on a collar and stand for this shirt.  The problem?  I only have patterns for a buttondown collar and a rounded collar (which came out like crap because I stink at sewing curves).  

I will have to make my own collar pattern.  


My goal is a narrow spread collar, so I made a mock up using my Swedish tracing paper.  It can be sewn just like fabric.  I was able to experiment with the spread by wrapping the paper collar around my neck and folding it to a shape I liked.  Once I was satisfied, I ripped the seams apart and simply traced a new collar pattern based on my various folds.  


Ok, I own the shirtmaking book by DPC.  I'm not mentioning his name here for fear of being sued.  This book brings on an instant headache for me.  If I had some prescription pain killers I'd be taking them.  Nevertheless, I've decided to follow his directions for a collar with slots for collar stays.  For some reason, founded or unfounded, I'm worried that my little spread collar won't hold its shape.  So here goes....


The edge of the collar is folded back and trimmed off.  Then a 4 - 5" scrap of cloth is basted into position behind it.


The 1/2" slot for the stay is stitched through all the layers.  I think you just have to use your intuition about the angle that bisects the point of the collar.  Also, there has to be room to get the stay into the slot, so be aware of where the seam allowances are. 
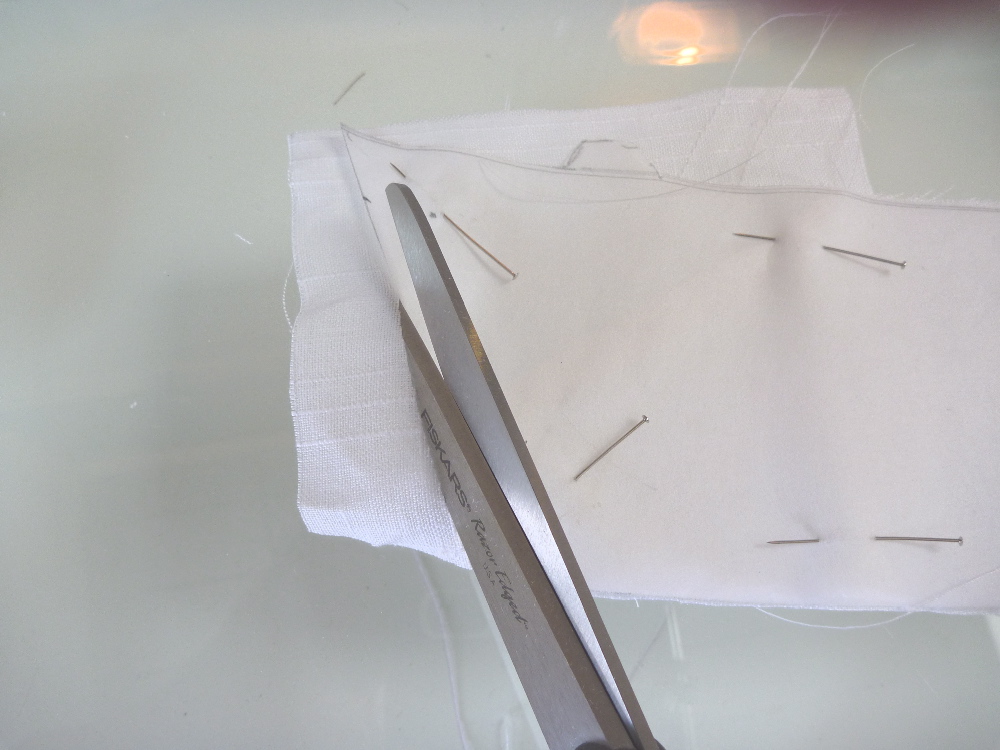


Once the slot is stitched the pattern is pinned back onto the collar and the scrap is trimmed.  Now you're back to the original collar shape. 


Here's how it looks after the collar is stitched, turned and attached to the stand.  Yay!  This ended up better than I anticipated.  Time to attach the collar / stand to the shirt.  

At this point, however, I put DPC back on the shelf and go to Peter's shirt sew-along instructions .  Attaching the stand to the shirt is the most challenging part of shirtmaking for me, and his technique has work the best for me.  Still it's never easy and quite time consuming to do well.  


Getting there!  Time to give it a rest.  All that's left are buttonholes and hemming.  

Wednesday, July 11, 2012

Little shirt details

All the while I'm working on this project I keep thinking about that joke -- How do you get to Carnegie Hall?  Practice, practice, practice.  It's the same with shirts, it's all about the practice.  It's also all about embracing the details rather than dreading them.  I really have to slow down and just take it a step at a time.  I finish a little fussy bit and then I walk away.  Needless to say it takes me forever to complete a shirt!  

Here are some of the little details that I've been wading through. 


Because I'm using a striped fabric I opted to do a two piece yoke.  The stripes end up parallel to the front edge of the yoke, and a chevron forms at the back.  I think it adds some interest to an otherwise very plain back.  I'm also very pleased with my matching.  

I had plenty of fabric to work with for once, but if I had been running short a two piece yoke is the way to go.  In many cases the four pieces required can be cut from scraps.  


The sleeve plackets are from David Coffin's book.  I really enjoy making them.  It's total sewing origami.  The linen pressed beautifully, so they were a snap to do.  


I've been spoiled by my homemade shirts.  I want them as nicely finished on the inside as the outside.  No serged seams for me.  This pic is of the inside of the sleeve / body.  The horizontal seam is a sort of "faux felled" seam  at the shoulder.  After sewing the sleeve / body seam I trim one side of the seam allowance and fold the other allowance over it.  Then I topstitch from the outside.  The vertical seam is a French seam that closes the sleeves and sides of the shirt.  This was my first time doing this, and it's much easier than a felled seam.  


I've decided on a single French cuff rather than the doubled back variety.  It's just not as clunky and formal, and more fitting for a casual shirt.  I edgestitched the cuffs rather than use the typical 1/4" topstitch.  Just a personal preference.  


Oh, and I splurged on these.  :)

Monday, July 9, 2012

Back to the blog. Hopping on the linen shirt bandwagon.


Readers, I took an extended break from sewing to work on a backyard fountain.  It's been a long drawn out affair.  Not only has there been a lot of backbreaking digging and hauling of dirt, but most of my days off in June were rainy.  There were times I thought it would never be done, but it's finally up and running.  There are still some finishing touches to be fussed over, but now there's time for a summer sewing project.  

Maybe you've noticed.  All the sewing guys have been making linen shirts, so I'm joining in!


I think Tom started the trend with this classic white number.  


Then Peter came up with this crisp pink version.  


I'm going to be using a textured stripe linen that I picked up at Graylines Linen , 260 W. 39th St.  If you love linen, this is your store.  The selection is huge, the staff is friendly and helpful, and the prices are surprisingly reasonable.  This fabric just screamed "summer shirt" to me.  It's 60" wide, so I will be able to get a long sleeved shirt out of 2.5 yards with fabric to spare.  Total fabric cost -- $23.75.  I'll end up spending more on buttons and cuff links!  


Making a tuxedo shirt was one of my goals for 2012, so I'm going to attempt a casual linen version.  This pattern has been in my stash for awhile.  Upon opening it I discovered that it's really just a straightforward shirt with the addition of a pleated panel (plastron) topstitched to the shirt fronts on either side of the plackets. 


So rather than reinvent the wheel, I'll just use the plastron piece and add it to my tried and true buttondown shirt pattern which fits me well.  


I cut the plastron pattern pieces and clipped the edges to mark the fold lines.  Linen, especially light weight linen, has a tendency to shift all over the place.  Getting the pleats even was damn near impossible, but I'm happy with the results.  I keep telling myself that it's a casual shirt, and that the slightly uneven pleats just add to the effect.  BTW the directions for doing the pleating were almost impossible to understand.  


The plastron sections are then tucked under the front plackets and basted into place before topstitching the plackets.  


After basting and edgestitching the plastron onto the shirt fronts, the neck and shoulder edges are trimmed. From here on out it's pretty basic shirt construction.  Time to start checking Etsy and Ebay for cuff links!  

Monday, May 21, 2012

Happiness is..... The completed safari jacket!


All the loose threads are clipped.  All the buttons are sewn on.  The sun is shining so it's time to get outside and model the circa 1975 safari jacket.  


I'm a happy guy in my new safari jacket!  
Simplicity 6887 with a few modifications here and there. 


The pattern had a HUGE disco collar that I whittled down.  I also replaced the button cuffed sleeves with a two piece vented sleeve.  


The undercollar , back vent and sleeve vents have contrasting fabrics.   


Here you see the patchwork madras at the collar and back vent.  


I know a lot of people think "ick" at the idea of a safari jacket, but it really turned out more like a mini trench coat in my opinion.  It's a versatile color for me and goes well the the purples, olives, aqua and peach that make up the bulk of my wardrobe.  I'm not totally thrilled with the set of the sleeves, but for a casual jacket it's OK.  There's a substantial amount of lycra in the fabric which just doesn't want to "relax" no matter how much I press.  It's been a good lesson learned and I'll keep it in mind when shopping for fabric in the future.  

I'm going to be putting the sewing machine away for a bit while I work on building a backyard fountain.   Happy sewing to all of you!  

Monday, May 14, 2012

Safari -- A whole lotta hand sewing!

We've had some pretty miserable weather recently.  So it's been a good time to stay in, watch season 2 of Downton Abbey and do a ton of hand sewing.  So here's a glimpse of what's going on with the safari jacket.  


This is a hemming technique from my old pal Edna Bishop.  Parts of it are a PITA, but the end result is worth the effort.  The jacket hem is 1.5", so a 2" wide bias strip of muslin is tucked down inside the hem.  The two pieces of fabric are then stitched together with a 1/4" seam.  I find it easiest to baste first (of course).  I only have one foot for my Singer 310, so the 1/4" stitch requires me to pass the whole jacket through the middle of the machine.  It's cumbersome, but possible.  


The jacket fabric is folded back and hemmed into the muslin using loose 1/2" stitches.  The hem will be virtually invisible from outside the jacket.  


While I still have access to the inside of the coat I tack down the edges of the patch pockets.  I don't know about you, but I hate the "flaps" around pockets that have been stitched on with 1/4" topstitching.  The time spent on this next step is worth it to me.  Working from the backside of the jacket I make diagonal stitches around the pocket.  I can feel with my non-sewing hand where the edge of the pocket is, so these stitches move along quickly.  Sometimes I "go too deep" and a little stitch will show on the front.  I just clip it out and throw in a few more stitches.  It's all covered up with the lining, so no one has to know. 


I refer back to my Roberto Cabrera tailoring book when it comes time to do the back vent.  I always feel that I'm just muddling along.  (Which I am!)  The right half of the vent is easiest to deal with.  The center back seam of the lining just continues down the back flap very close to the edge.  The other side is always a challenge.  I work the lining across the bottom hem starting at the jacket front.  As I approach the vent it becomes clear what has to happen.  I just keep pressing and basting until it works. 


Here's the completed vent and lining. 


I like to finish it off with pick stitching.  


I want some of the contrasting sleeve vent to show.  So I've opened it out slightly and basted it into position.  The sleeve lining, and to some extent the button,  will hold the vent open.  


This is a little belt restraining strap that prevents the belt from being separated from the jacket.  The Japanese trench coat has this feature, so I duplicated it here.  Now all that's left is to sew on the buttons and clip all the loose threads.  Hopefully I'll be able to model the finished jacket next week.  

Tuesday, May 8, 2012

Safari -- The odds and ends post

This is sort of a catch-all post.  The outside of the coat is essentially finished, as is the lining.  Time to put the two halves together.  


There is hardly any interfacing in this jacket if one follows the directions.  Basically there are only  2" wide strips down the center front bands.  Not much structure to be had there.  So I'm borrowing a page from one of my old standbys --  The Bishop Method of Clothing Construction by Edna Bishop.  A hair canvas interfacing is cut using the front facing pattern piece.  It's cut 1/4" wider than the pattern and is then freehand cut to flair out to the shoulder width.  This creates an interfaced panel over the upper chest.  A muslin interfacing is cut for the back that continues the curve.  Once it's all assembled at the shoulders the interfacing is basted to the wrong side of the lining.  


This is a step I almost forgot!  The epaulettes are basted across the shoulder seams.


Now is also a good time to add a hanger loop.  It takes only a few minutes to make one and baste it into position on the inside of the lining.  I skipped this step on my frock coat and have regretted it ever since.  


The collar is pinned and then basted into position.  All of the edges have been staystitched and I clipped both the neck edge and the collar about every inch.  This makes the collar much easier to attach.  


The lining with its attached interfacing is then flipped to the outside of the jacket so that the collar is sandwiched in the middle.  


Then I baste the hell out of everything as usual.  There are 6 layers to sew through here.  9 when I stitch over the epaulettes. 


Even with all that basting I still ended up with a little catch!  Grrrrrr!


The collar is trimmed out of the seam VERY CAREFULLY.  This is no time for a slip up!


I also trimmed away the interfacing.


While I still have access to the inside of the coat I added a sleeve head.  It's a 1.5" wide strip of bias cut wool sewn over the cap of the sleeve.  I experimented with both a single and double layer.  The single layer worked best.  The edge of the wool is aligned with the sleeve seam allowance and handstitched very close to the seam.  The goal is to "fill out" and improve the "fall" of the sleeve.  The result isn't stellar, but I keep telling myself that it's better than nothing.  

From here on out it's mostly hemming and handsewing the lining, which I actually enjoy.  

Thursday, May 3, 2012

Safari -- The lining


Simplicity 6887 is for an unlined jacket, but making a lining isn't all that hard and will really improve the wearability of this jacket.  I just need to prepare myself mentally for working with polyester acetate, which must have been invented by the devil.  


I'm using a lightweight lining that's been in my stash for almost 2 years.  I bought it in a fabric dive on W 35th St. with a certain celebrity sewing blogger who has a strong dislike of heavy linings.  It was intended for a fall coat (the purple coat), and after getting it home and prewashing it, I decided it was just too wispy for my Maine climate.  So it's been sitting in a bin ever since.  

It's an iridescent brown / blue and will be perfect for this jacket.  


This jacket has a back yoke, so I'm making the lining yoke out of some leftover oxford cloth.  I'm hoping this will beef up the shoulders a bit, plus I just like the contrast.  Both the back yoke and back sections are cut an extra 1" wide to allow for a center back pleat.  


Extra fabric is cut onto the sleeve sections for wearing ease.  This is a technique I learned from the Japanese coat book.  It adds extra ease to the armpit area and prevents rip outs.  I'm not too precise about it.  I just mark an extra 1" to 1.5" with chalk and cut.  Everything eventually gets eased into place. 


After much slipping and sliding of fabric (and cursing) I end up with this.  I have a few details to attend to on the  outside of the coat, namely making and positioning the belt loops.  Then I will tackle attaching the lining and collar.