Showing posts with label Fashion Sewing Supply. Show all posts

Sunday, December 24, 2017

The ?Couture? Jacket -- Wrap-up

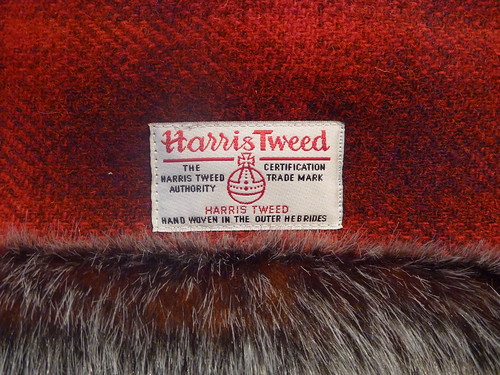
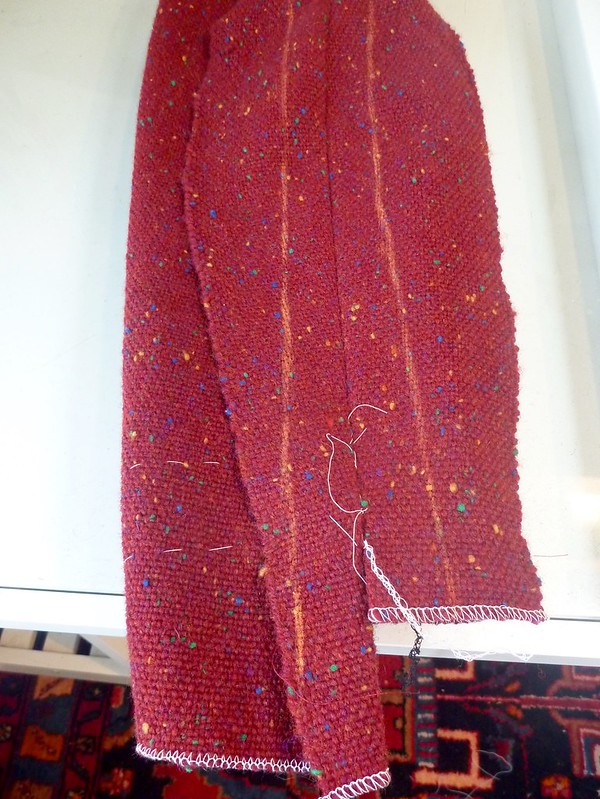
Do you remember that I was considering making a "French Couture jacket"? It was ages ago. You've probably forgotten the whole thing. I armed myself with Claire Schaefer's book, cranberry wool tweed woven by my mom, bronze buttons and some foufy mohair trim. So what the hell happened.....where to begin?

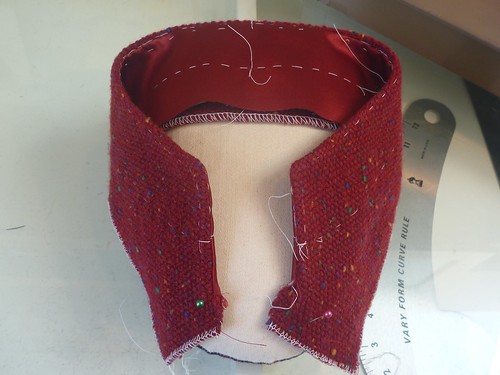
The general consensus from you, my readers, was that the froufrou trim had to go. I'm just not Pharrell Williams enough to pull that look off. On me, it would be "ladies who lunch" gone WAY wrong. So I went back to the trim stores in NYC and settled on a burgundy faux suede with contrast edge stitching. Decidedly simpler but not flexible enough to conform to my pattern's curved collar and lower front edges. Rather than fight with the trim to make it curve, something it was NEVER going to do, I squared off the collar and jacket fronts. In sewing, as in life, you have to pick your battles.


Overall, the pattern was fairly easy to fit. I increased the width of the collar (there just wasn't enough room for the trim), shortened the body by about 4" and added extra curve to the upper back (the dowager's hump adjustment, ouch! Like that doesn't make me feel ancient). Then the real games began.


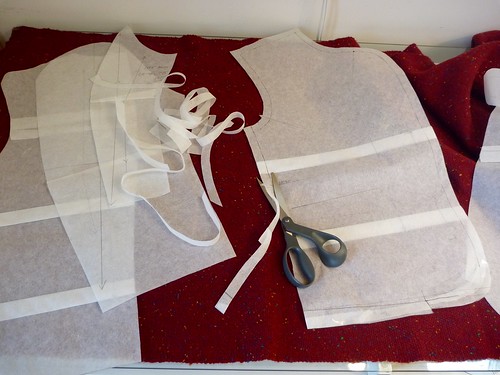
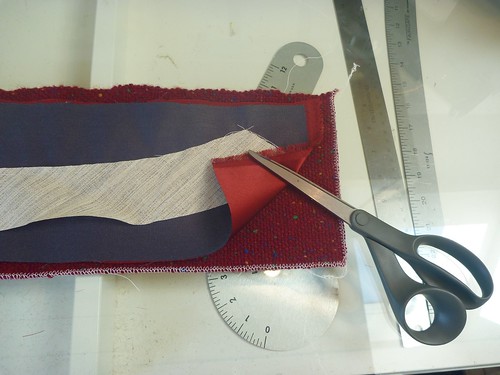
Straight up....if you're looking for the most complicated and time consuming way to construct a garment, this "Couture jacket" will be right up your alley. None of it is particularly difficult....cumbersome is the word that comes to mind. Here I'm cutting off all the pattern seam allowances to start.


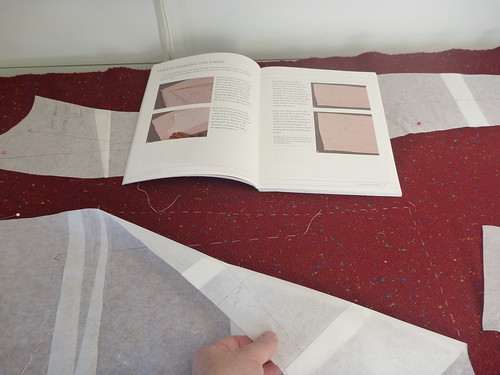
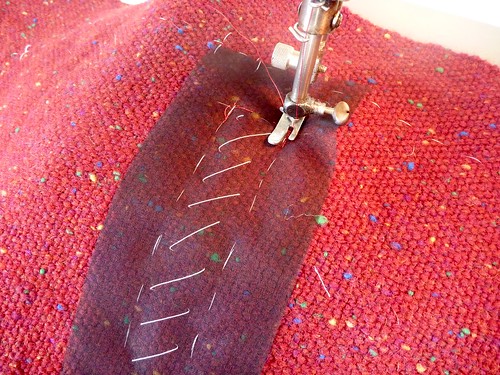
Then the pattern shapes are thread traced onto the fabric. There is, of course, a very specific way in which this is done. Thankfully, Schaefer's book is well illustrated. The grain line, notches and any other marks are also marked with thread. Get ready to use a huge amount of cotton basting thread!


Each thread traced piece is on a rectangle of fabric. I swear, the real "luxury" of this construction method is the shear waste of precious fabric that ensues. The fabric gets handled extensively, so I ran all the cut edges through my serger to prevent raveling.


I'm not really sure what part this is, but the thread traced seamlines get lined up, basted together (harder to do accurately than one might think), and then sewn on the machine. I then chalk marked generous seam allowances and ran them through the serger to both finish them and cut them down to a manageable size. So much of my mom's handweaving went into the trash. Criminal.


This is about as far as I got sticking to Claire Schaefer's directions. I started to veer off on my own course... more tailored jacket, less floppy cardigan.


I'm sure Coco rolled over in her grave on this one. I interfaced my jacket fronts with a lightweight hair canvas. The "couture jacket" has just the tiniest strip of silk organza selvedge caught in the front edge openings. I also stabilized the shoulder seam with a semi-bias strip of lining material. That's a Roberto Cabrera thing.


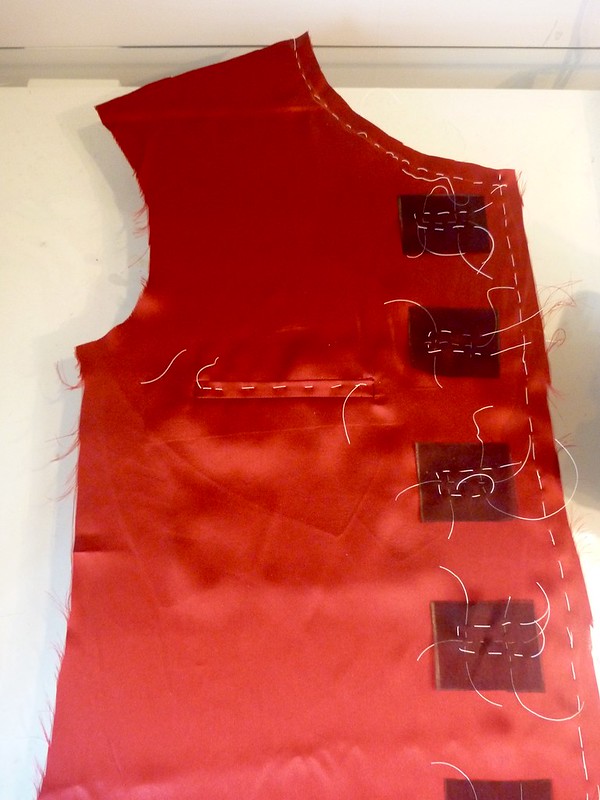
Veering even further of course, I wanted welt pockets and bound buttonholes. Not the patch pockets and handworked buttonholes that are the hallmarks of the couture jacket. Oh, and that "Coco-ism". -- "No button without a buttonhole". Forget that!

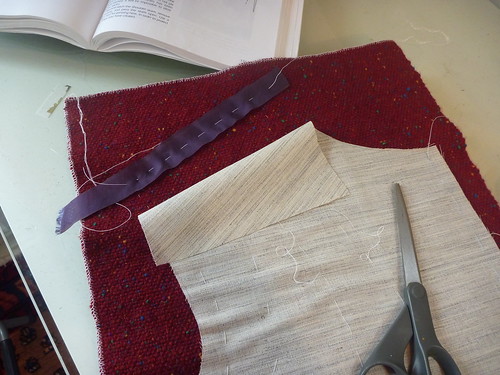
I don't know about you, but I always like to practice the tricky bits before I launch into something that has the potential of ruining a project. So....


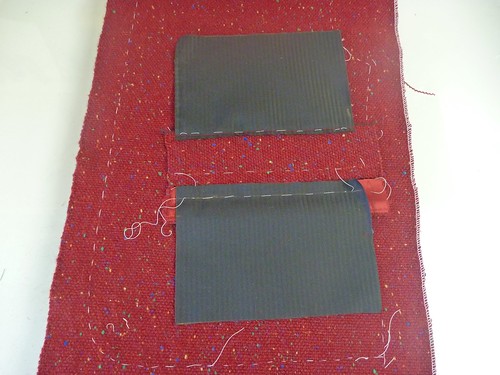
This is a mock up welt pocket that I made with left over scraps. I used Edna Bishop's method. She calls it a "regulation welt pocket". It's surprisingly simple and straightforward once you get up the nerve to start slashing your fabric! For this jacket, I needed to prove to myself that it was going to be possible, considering the bulk of the fabric. I tried to reduce bulk in every way possible.


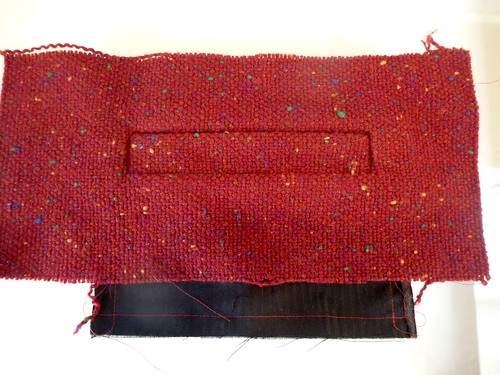
As luck would have it, making the pocket was entirely possible. The welt is lined with silk charmeuse to reduce its thickness, and there's some serging that will never be visible to keep some seams flatter. So the welt pockets are a go.


I also made a trial bound buttonhole. The welt is the reverse side of my silk charmeuse beefed up with a scrap of Fashion Sewing Supply's Pro-weft Supreme fusible. Reassured that these features are indeed possible, it was full steam ahead.


A piece of silk organza was used as a reinforcement for the welt opening.


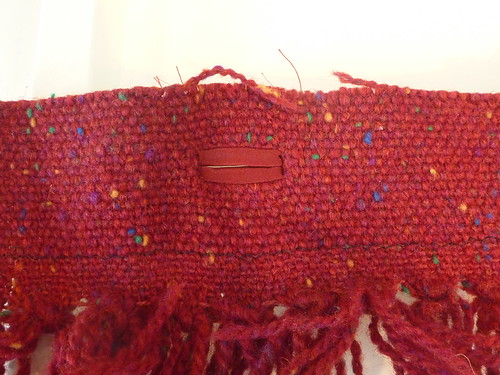
The pocket in process. I baste a lot! But it's always time well spent.


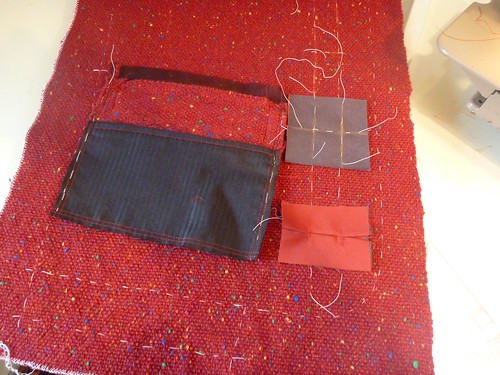
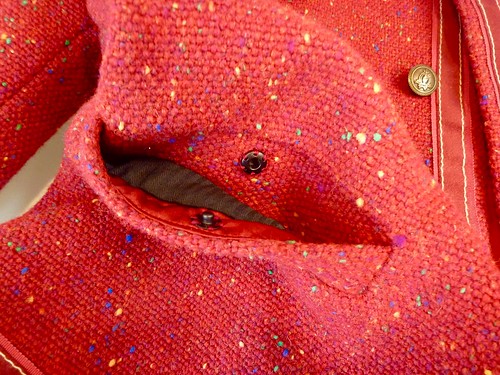
Here is the finished pocket (a success) , and the beginning of a MAJOR screw-up. Maybe you see it. I positioned the welt for the second buttonhole on the WRONG side of the jacket. I blissfully followed Laura Mae's fabulous bound buttonhole tutorial (here), marked, stitched, cut open and flipped everything to the....

WTF have I done moment!!!!

Once my blood pressure was back under control, I set about correcting the mess I'd made. I positioned a new welt piece onto the outside of the jacket (where it should have been in the first place) and restitched everything directly over my original stitching. I then very carefully cut the incorrect welt away as close to the stitching as I could get. With tweezers I was able to remove any remaining fibers. Disaster averted. The buttonhole may be a touch smaller than the rest, but I don't think anyone else would notice. Fortunately, there were no other screw ups.


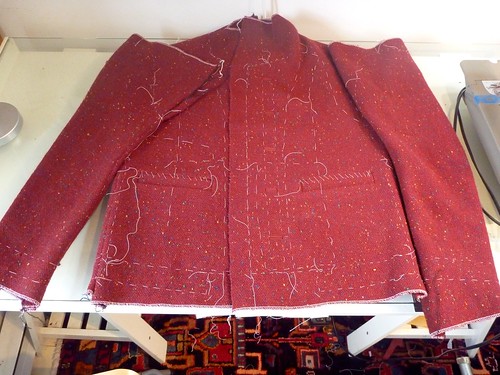
Arcane construction becomes the norm. Mon Dieu! I quite honestly can't remember how I attached the sleeves, but somehow it happened.

But I've blabbed on long enough. If you've stayed with me this far, scroll down through more "in process" pics to see the final result.


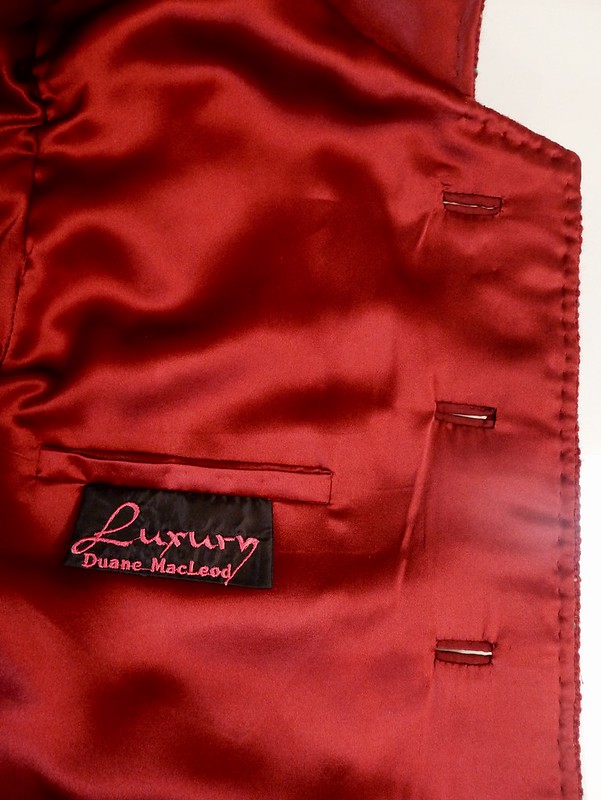
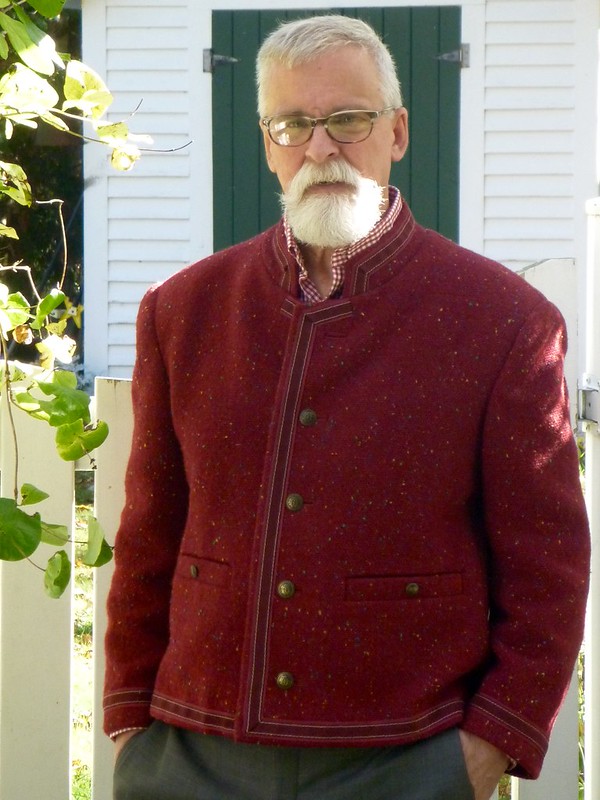
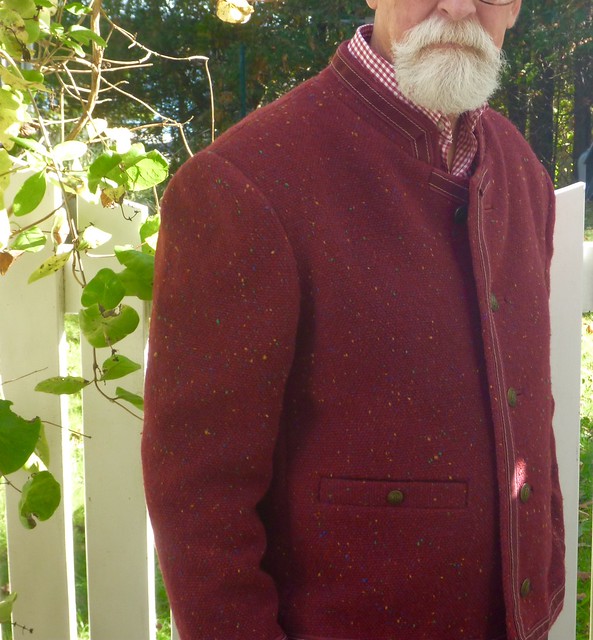
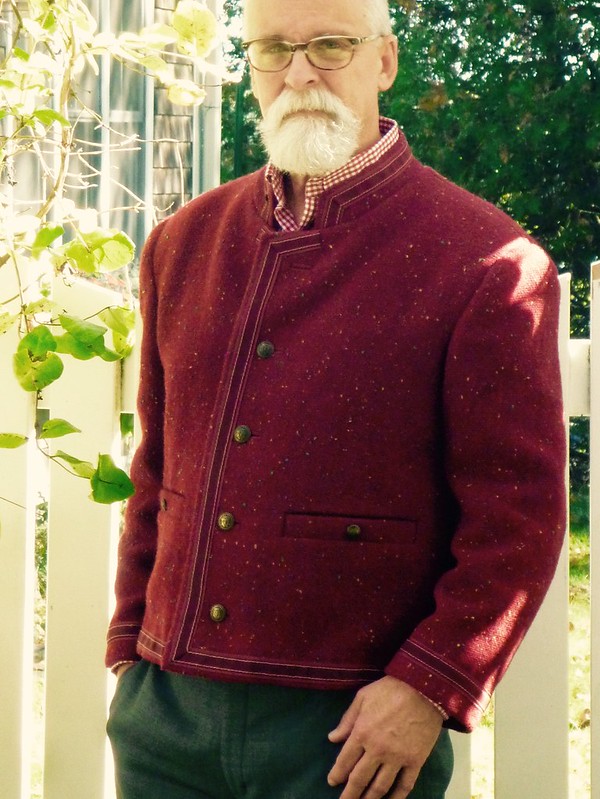
I wore this outfit to host a rehearsal dinner for my son's wedding in October. By then, all the complexities and frustrations of constructing the jacket were a thing of the past, and I just enjoyed wearing it. It truly turned out to be exactly what I wanted. My idea, my execution. A way to honor my mom's artistry and craftsmanship. A little bit French inspired (without the "Ladies Who Lunch" vibe), a little military, a little tyrolian, tailored (but not overly), with a hard to describe sensation of wearing something truly special.


As always, I am so grateful for the support and inspiration I receive from the sewing community. I've sort of fallen off the blog bandwagon a bit, but I still have projects to share. Be well, and happy sewing!


Thursday, September 14, 2017

David's Bag

I had a good sized piece of faux fur left over from my backpack project of last year.


And....I heard a very loud "I want one!" from this guy.


This is my great friend David, the ultimate lumbersexual (if that's still a thing!). He lives in New York and he's always willing to tromp the garment district with me for hours on end, and then turn around and build a deck or shingle a dilapidated backyard shed. Trust me, there aren't many guys like that. I'm keeping him around!


In his day to day life he works for the company that provides services for the hearing impaired on Broadway. It's a very stressful job, and he looks forward to Monday nights when most of the shows "are dark". (Look, I'm learning some theatre lingo!) Every other day usually finds him frantically running from theatre to theatre, putting out fires just before the curtain goes up. Employees don't show up, equipment fails, bus loads of senior citizens arrive and overwhelm the service, Snarky patrons are out of control and need to be placated. Things rarely go smoothly. A warning to tourists in Times Square....don't get in his way, he'll run you over! This man needs a bag that can multitask as much as he does.


Plan. A messenger bag to hold his laptop, which can also become a large tote bag to schlep the various headsets and hand held devices between theatres.


David loves buffalo plaid anything, so I set out looking for some wool fabric that would play nicely with the gray faux fur. My online search eventually lead to Etsy and a piece of ombré Harris Tweed. I like to think of it as buffalo plaid with a twist. https://www.etsy.com/shop/EsplanadeLondonCloth.


I think any bag maker will tell you that an arsenal of different interfacings makes for better bags. There are so many available, from stiff plastic-y ones, to ones that are thick and cushioned.


This is my new favorite! Medium weight Pro-Weft Supreme from Fashion Sewing Supply. It's a soft brushed knit interfacing with some slight stretch in one direction. I used it to back all the Harris Tweed parts of David's bag. It's a dream to work with, and fuses at a lower setting than the interfacings I would use for a shirt. I save every little scrap of this stuff. It's that good! Since making this bag I've used it to interface welt pockets, bound buttonholes and pocket flaps.


I don't have very many progress pics of this bag. This is the recessed zipper opening for the top of the bag in process. It's a nice feature to have, especially when the stuff you're toting needs to be protected. I highly recommend this video https://youtu.be/R-CHW9EEd3k. Like so many things in sewing, what looks complicated really isn't. What I love about this video is that everything ends up finished in the end. No ragged edges anywhere. Your bag will be as beautiful inside, as out.


I lined the bag with quilting cottons from JoAnn's. There's a padded divider to hold David's laptop along the back of the bag. It has a zippererd pocket on the front side. Kyle, (my bag guru!) from Vacuuming the Lawn, shared a great tutorial on how do do this. So I'm passing it along. http://emmalinebags.blogspot.com/2012/01/how-to-sew-zipper-pocket-tutorial.html. Again, what looks complicated really isn't.


There are three small pockets along the front of the bag. I used some rivets as reinforcement along the top edge, mostly because I just love setting them!


Here's the finished bag in "tote bag mode".


And here in "messenger bag mode".


The antique brass hardware for this project was from Buckle Guy and Emmaline Bags. Both, excellent sources.


We're all smiles with our fur bags! Have YOU made one yet?


Wednesday, November 30, 2016

Repairs Completed or..... Rip, Sew, Scream, Rip, Repeat.

OK. This exercise is completed, and it's been a journey for sure. At one point I was screaming louder than the collective scream heard from coast to coast a few weeks ago. My strategy was to take a break, go to yoga class, breath and then calmly return to the whole mess.


Yes, it got messy! The shirt in particular. But first up...the safari jacket.


This was the easier of the two repairs. I opened up a slit in the lining's side seam just big enough to put my hand through (I didn't want to mess with the armhole). Then it was easy to reach up inside and pull the sleeve head down and out. And what to my wondering eyes did appear?


Why, a sleeve head and seam allowance clips everywhere! All part of my failed attempts to improve the set of the sleeves way back when.


This time around I reduced the height of the sleeve cap by 5/8" at the apex, and then graded the curve down to the front and back notches. This greatly reduced the amount of easing required.


After sewing the new seam, I stitched in a new wool sleeve head over the top of the sleeve. This technique is from The Bishop Method of Sewing Construction, by Edna Bishop. A bias cut strip of wool 1 1/2" wide is lined up with the edge of the seam allowances, and then hand sewn in close to the seam. It sounds more difficult than it is. When the sleeve is turned rightside out the strip will fold over on itself and fill out the top of the sleeve. That's the theory anyway.


And here's how it turned out. It's not perfect by any stretch of the imagination, but still a big improvement. If it weren't for the Lycra in the fabric, any little dimples could have been steamed out. Alas, they just spring right back. Still, this repair is a win in my book. The safari jacket is back in rotation! (And I will continue my resolve to NEVER buy stretch fabrics again!).


On to the shirt.....


Picking apart a shirt is an exercise in patience and perseverance, especially when it's sewn with about 20 stitches per inch.


After what seemed like hours, I had a pile of abandoned parts. Cuffs, collar, stand, interfacing and the entire left front placket. From there, things actually progressed quickly. I had more than enough fabric to remake the replacement parts which I interfaced with Shirt Crisp interfacing from Fashion Sewing Supply. Everything was assembled and wouldn't you know, my old Singer 301 refused to make a buttonhole. Ugh!


I pulled out the Janome Magnolia, my backup machine, and figured out how its buttonhole attachment works. I had never used it before. My practice buttonholes were coming out perfectly. I bet I made at least 10. Everything was working flawlessly. The buttonholes on the placket and cuffs came out perfectly. I was cruising towards the finish line. And then....I had to make the small buttonholes on the collar.


Wouldn't you know. The F'ing contraption just took off on its own and decided to make a huge butttonhole. To make matters worse I had set the machine for its most dense stitch. Needless to say there were some choice words said. By the time I picked it out, the fabric was pretty well shredded. In fact there was actually a hole on the undercollar.


In another act of brilliance, I though a dab of Fray Check might help. Wrong! It bled through to the upper collar and left a stain. At this point a cooling off period was in order, so I put the whole mess aside for at least a week.


I had just enough fabric to make another collar, so I ripped the whole thing out again and started over. This time around the buttonhole gizmo worked perfectly, but I still held my breath through the whole operation. So what did I end up with other than frazzled nerves....?


A shirt that will actually get worn. I made a few stylistic changes this time around. The placket and collar are cut on the cross grain, I added a buttoned pocket, and swapped out the light colored buttons for something darker. The shirt will always have its flaws (I've learned a lot about shirtmaking since I made this), but overall it fits in better with my wardrobe, and I no longer feel guilty about the clothes that I never wear.


What's next? Some "secret sewing", and then a fresh project. Wishing you all happy sewing!


Wednesday, October 26, 2016

The Troubling Ethics of Clothes That I Never Wear

Maybe you caught this little post from Sewing on The Edge which linked to an article about a minimalist / capsule wardrobe? While my wardrobe is hardly minimalist, I do try to make clothes that I want to wear. Still, there are clothes that I've sewn that, for one reason or another, I NEVER wear.


There's something vaguely unsettling about this. I don't regret the time and effort involved in making these clothes; but to never wear them seems a waste of resources. To remedy this situation I'm going to undertake "rescuing" two items that never see the light of day.


First up....


My safari jacket.


I should be wearing the hell out of this jacket right now, but I cringe every time I see the horrible set of the sleeves. This mess is the collision of two problems....one, too much sleeve ease...and two, a stretch fabric that doesn't allow the extra ease to be steamed out. Note: this project made me swear off stretch fabrics forever. I've replaced this jacket with my wool Halston shacket, but I truly miss wearing it, especially this time of year.


This jacket was both a ton of work, and a joy to make. To have it languishing in the closet because I'm too embarrassed to wear it is a shame. My plan is to open the side linings and pull the sleeve through, shorten the sleeve cap and put things back together. I may even put in a little wool sleeve head to give the shoulders more structure. Here's hoping!


Next problem child...


The first shirt I ever made!


I made this shirt when Peter had his Shirt Sewalong (I think he was making the Negroni?). I think I've worn it once, which is a shame because it's a fine Italian cotton in a great color for me. Sadly, it has some issues. Some I can fix, others I'll just have to live with.


The biggest problem is lack of decent interfacing. It's just interfaced with white cotton fabric with little to no body. Since making this shirt I've learned just how important good interfacing is to a shirt. Hence, my addiction to Fashion Sewing Supply's "shirt crisp" interfacing. For me it's the difference between a shirt that gets worn, and one that's relegated to the back of the closet.


Next problem, the full French cuffs. Fun and novel as they are, they're just not me. They've gotta go.


Ummm...this was the best I could do at the time. Reality check, I still can't sew a curve worth a damn, so I'll replace the whole collar and stand (God willing). This time around it will be a button down, which is much more my style (and NO curves involved!). With a little love, I'm hoping to get this sad shirt back into the game.


Thankfully, I saved a good sized hunk of this fabric. Vindication for all us sewists who save all our scraps, and sometimes scratch our heads wondering why we do it!

Time to break out the seam ripper.