Tuesday, January 31, 2012

Things that have come in the mail


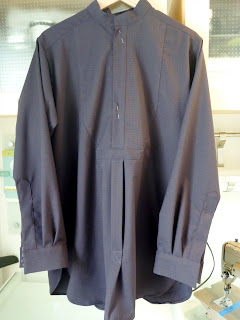
Sadly, there hasn't been much sewing going on here lately.  The victorian shirt is essentially complete, just waiting for buttons.  The selection at JoAnn's is pretty dismal, especially when one has been spoiled by the garment district in NYC where there are entire stores devoted to buttons.  Unfortunately, there aren't any trips to the city in my immediate future, so I've turned to Etsy in search of buttons.  I find Etsy totally addictive and have enjoyed / wasted hours looking over the most amazing stuff.   I started out looking for buttons and low and behold stumbled upon these beauties!  


Vintage tigereye and sterling cufflinks.  I've redesigned my shirt with a single French cuff and these will be perfect.  They are from Tigers and Bears of Boston, MA.  I love the combination of dark purple and brown.   During my button search I also found a pair of vintage baltic amber cufflinks which were too reasonable to pass up.  They're coming from Moscow (not to be confused with Moscow, Maine), so I'm not anticipating them anytime soon.  I think the amber will look equally as smashing with the purple.  

Even though a certain blogger that we all know and love is predicting this to be the year of dusty rose and teal, I'm dreaming of all things purple, brown, bronze and amber.  Thanks to Etsy I found some great little amber buttons that should arrive later this week.  Then I'll be able to wrap this project up.  

Of course there's more to Etsy than buttons and cufflinks! 


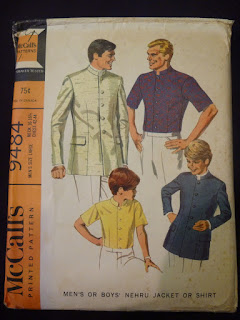
OMG! This was love at first sight.  A Vintage 1968 Nehru jacket and shirt.  The pattern is still in its original folds.  How sad that no one ever made it.  I hope to remedy that situation sometime this year.  This will provide a real learning opportunity for me since it's two sizes too big for me.  I will have to learn how to grade the pattern down.  I'm looking forward to the challenge.  A huge thank you to Wheeler Salvage for finding this gem.  


Just waiting for the buttons to arrive.  Then I'll be ready for the cocktail party!  
Tuesday, January 17, 2012

Shirtmaking -- How slow can you go?


It's amazing how much precision sewing goes into even the cheapest RTW man's shirt.  I'm sure there are all sorts of special machines and feet that create the various seams.  Nonetheless, the craftsmanship is pretty amazing, especially when you're trying to re-create that level of exactness on a home sewing machine.  

It's been awhile since I've made a shirt and I forgot how challenging, yet at the same time satisfying, the process can be.  Truly, the devil IS in the details when it comes to making a shirt. My only suggestion is to just proceed very slowly.  I just crawl along taking it one seam at a time.  

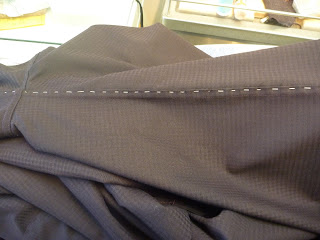
As usual, I baste the hell out of everything.    


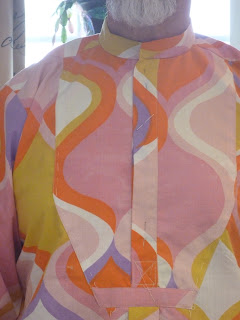
Here I'm working on the plackets and bibs.  This is the major design feature of this pattern and I want it to come out well.  The seam allowance of the bib is pressed under and it's edgestitched to the shirt front.  There is a lot of edgestitching on a shirt, and I find it extremely challenging to do well.  I just go very slowly and take it a few inches at a time.  


This is the presser foot of my Singer 301.  To edgestitch, the fold of the fabric is aligned with the inside edge of the right side of the foot.  This will make a line of stitching about 1/16" from the edge.  It takes some practice.  Basting the seam before edgestitching helps hold the fold in place.  I also find having a very high intensity light focused on the presser foot helps me see better, which in turn helps keep me "on track".  


I think my fabric is a cotton / polyester blend with a touch of lycra.  It has a great drape, but it doesn't take a pressing very easily.  I've decided to make the flat felled seams of the body and sleeves on the inside of the shirt.  I basted the folded over seam allowance in place, and then stitched 1/4" from the seam from the outside of the shirt.  Not exactly Kosher, but it looks better than a poorly done flat felled seam out where everyone can see it.  Oh, BTW, the pattern calls for 1/2" seam allowances.  I think that would be incredibly difficult to flat fell, so I increased it to 5/8".  Why make hard things harder than they have to be?  


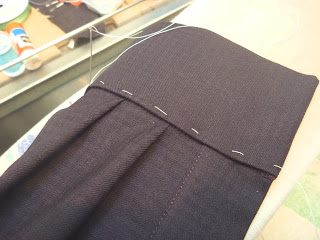
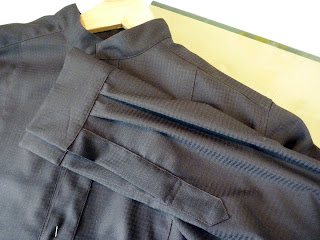
Here is the cuff basted in place ready to be edgestitched.  I consolidated the excess sleeve fabric into two tucks rather than the nine small tucks called for by the pattern.  I've also made the cuff a single French cuff.  I picked this idea up from David Coffin's book on shirtmaking.  It's a little bit dressier than a typical barrel cuff, yet not as heavy and clunky as a double backed French cuff.  


A final shot showing some of the details.  I'm totally loving how this is turning out.  I've been looking at vintage mother of pearl shirt studs on Ebay and Etsy.  I have no idea how they work, but they could be a unique option for this shirt.  

Thursday, January 12, 2012

The revised muslin


I'm sure I can get this shirt to fit better.  I'll start with some easy fixes and hope it will be enough. 

I'm not a fitting expert.  These are just a couple of techniques that have worked for me in the past.   


Fix #1 is the easiest -- adding some shape to the back.   I start by laying a piece of Swedish tracing paper over the pattern.  As you can see the top of the back on the pattern is completely straight where it attaches to the yoke.  Therefore, there is no shaping to the back.  The shirt will fit better if the back seam is curved.  Starting at the shoulder seam I've drawn an arc up to a point 1.5" above the existing pattern.  That's it.  The curved back sewn to the straight yoke will act like two horizontal darts pointing to the center of the back.  You may also notice that the pattern as drawn has 7 small tucks across the back.  Personally I think that's more woman's blouse than man's shirt, so I'm going to fashion the excess fabric into a center box pleat.  


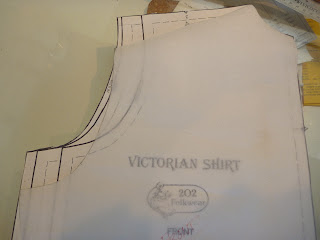
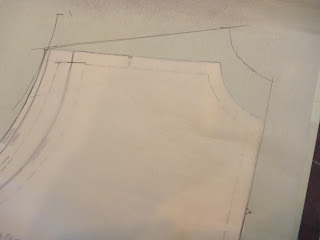
Now I move to the front for fix #2 -- the sloped shoulder adjustment. The pattern as drafted would only fit me through the shoulders if I inserted HUGE shoulder pads.  So I need to increase the slope of the shoulder seam.  It's a two step process.  The neck opening and front edge of the shirt will stay the same.  I drop the sleeve edge of the shoulder seam down 2" and redraw the cutting line from the original neck line.  Above you will see my new pattern laying over the original.  

On to step 2. 


Now I slide the pattern up until the new shoulder / sleeve point meets the original armscye.  The armscye is then retraced.  This process raises the center front of the shirt somewhat, so it may be necessary to drop the neckline just a touch.  I'm OK with it, so I'll leave it alone.  But if I did want to make that adjustment it would be very small, no more than 1/4".  


Here's what these adjustments have done after pulling the shirt apart and roughly basting it back together. The shirt now fits better across my upper chest, and the huge diagonal folds are gone. Yay! 


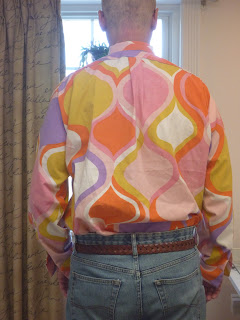
The back now has some shape across the shoulders.  I've also tapered the side seams and taken 4" out of the shirt's circumference.  Is it perfect?  No.  Is it better?  Hugely!  I'm satisfied with the improvements,  so I'm moving on and cutting this baby out.  

Wednesday, January 11, 2012

The - "what was I thinking???? - muslin


I'm not sure what on earth made me think I could just cut this shirt out and it would fit.  I really deserve a good "dope slap" for this one,  especially after participating in Peter's MPB shirt sew-along last year.  


Hopefully you can look past the crazy fabric.  This was a $2 twin sheet at Goodwill.  As always, I need a sloped shoulder adjustment.  Why I just didn't start there I'll never know.  Essentially this pattern, apparently based on an historical garment, is just a rectangle with sleeves stuck on it.  It really isn't going to fit anyone.  I'm not planning on attending any historical re-enactments any time soon, so I've got some work to do.  


The huge diagonal fold coming from my arm pit is a sure sign that a sloped shoulder adjustment is in order.  It sounds horrible, but I've learned that it's not hard to do.  On the positive side, the bib and plackets were very easy to do.  I've put in the "X" topstitch detail called for in the directions, but have decided to leave it out.  It's a little too Timberland for a dressy shirt IMO.  There's lots I don't like about this pattern, which I'll get into eventually. 


As if the front isn't bad enough, the back is voluminous.  


I added a sleeve  placket, a la David Coffin.  This alone is worth the price of his book.  I just wish his editor had made the instructions accompany the illustrations.  They don't, so one is constantly flipping from page to page to make sense of it all.  It's totally maddening.  I'm happy with the sleeve length, but the cuffs are too small.  That's an easy fix.  

Time to start ripping this mess apart!  There's hope for this shirt yet.  


Monday, January 9, 2012

New year -- New directions


It's a new year and time for some new projects.  But before I go any further I want to thank Sunni, of the blog -- A Fashionable Stitch, for featuring my pea coat on her blog.  I was totally blown away to learn this.  It's hard for me to believe that anyone is paying any attention to what I do!  For those of you who do, I hope it's informative and just a little bit inspiring.  

So, like most of you, I have some sewing goals for 2012.  As much as I enjoy making outerwear, it's time to expand my repertoire. This became evident when I dressed for a staff Christmas party with my department members.  Because I wear a uniform at work, my closet is primarily filled with casual clothes.  Plaid flannel shirt at a holiday party?  I don't think so.  In the end I wore a button down shirt, argyle sweater and wool flannel trousers.  Yawn.......  I'd much rather have been wearing something just a little bit more imaginative.  

A big sewing goal this year will be to make some slightly dressier additions to my extremely tired wardrobe.  


This is where I'll start.  The Victorian Shirt from Folkwear.  This is exactly the shirt that I wished I'd had for the Christmas party.  It's not totally crazy, has a dressy vibe and I'd be the only guy wearing anything like it.  That's my idea of dressing.  I'm going to be making it in a very dark purple cotton jacquard.  


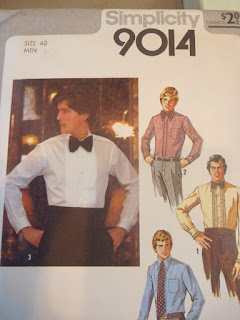
Oh ETSY, How I love you!   I think every guy could use a tuxedo shirt.  I've always wanted one but never owned one.  In a way they're sort of laughable, but they somehow can traverse the spectrum from formal to casual.  This is a shirt that I could get a lot of mileage out of.  Hopefully all that pleating isn't totally impossible.  Speaking of impossible, there won't be any ruffled version of this shirt!  And, oh, what about that huge bow tie.  That's out too.  


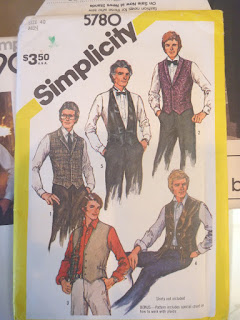
Another Etsy find.  I wouldn't mind having a nice assortment of vests in my closet.  They don't take much fabric and they're fun to wear.  I often see really beautiful fabrics when I'm in NYC, but can't for the life of me figure out what I'd do with them.  Vests are the answer.  


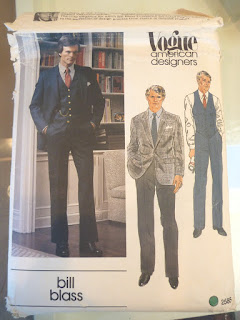
Lastly, check this out.  Vogue designer no less.  I got this pattern primarily for the jacket.  I'm not a three piece suit type.  The jacket has a reasonable lapel width and a double back vent which I think would be interesting.  I rarely dress up, but I do go to a work related conference every October.  Each year I decide between  the two silk / wool tweed sport coats that I own.  This year I want this jacket in velvet.  


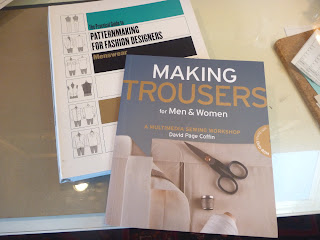
Lastly, some books have been added to my meagre collection.  I have never made a pair of trousers or jeans, so I got David Coffin's book.  I'm just hoping it's not as obsessive compulsive as his shirt book.  Don't get me wrong, I know it's a great book.  But it drives me crazy.  I also picked up a book on pattern drafting by Lori Knowles.  It's very straightforward and full of information.  One of my goals will be to draft both an upper and lower body sloper this year.  Why?  I'm hoping that it can make my projects more creative and less dependent on published patterns.  

It will be interesting to see how this year turns out!  Time to tackle the Victorian Shirt.  

Wednesday, January 4, 2012

The 8 degree (-13 C) photo shoot.


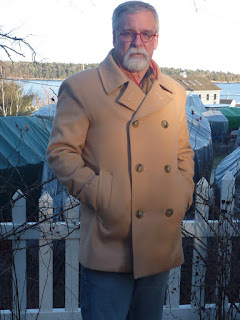
The "not so much wool" pea coat is finished!  


It was 8 degrees here in Maine today, so I'm wearing a flannel shirt, wool sweater and scarf under the coat.  On a day like today I'm very glad I decided to add the flannel underlining to the back.  I think it really made a difference.  


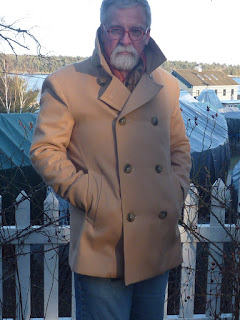
Here is the back view.  I'm pleased with the fit across the shoulders, and thankful that there's enough room for a few extra layers underneath it all.  


Here are some shots as the sun is fading.  The collar on this coat is huge, and when flipped up will really keep the biting winds out.  


So completes the Japanese pea coat.  I think I'll be getting a lot of use from this coat.  Up until now I've been wearing my frock coat (which I LOVE), but our weather has been unusually warm.  Sooner or later reality has to strike.  When it does, this will be my "go to" coat.  

At this point I've completed all 4 of the designs in the Japanese coat book.  Last year I thought I was just making a toggle coat, and look what happened!  I hope that my experiences will encourage other amateur sewist to tackle outerwear and tailoring.  Truly, if I can do it, anyone can.  

Right now, I just want to get warm and think of my next project.  


Tuesday, January 3, 2012

The home stretch -- finishing the lining

The rest of this project is all about handsewing, some of which is simple, some.... not so much.  Here goes. 

Up until now the back vent has been basted closed.  In order to work the lining around the vent the basting is removed.  The left vent (which is on the right when working from the inside of the coat, ouch-- makes my brain hurt) is actually an extension of the center back seam.  This is where I AM VERY GLAD that I clipped the  extended seam allowance on the lining.  I press the lining back using the clip as a guide and position the fold about 1/4" from the left vent edge.  Baste this in place.  Unfortunately,  none of this can be permanently attached until the lining is attached to the hem.  It will make sense as you work yourself through this process. 

I folded up the bottom edge of the lining 1" and pressed it.  The fold is then slipstitched to the hem of the coat.  I stitch along the seam where the muslin strip is attached to the hem.  This makes it very easy to keep the lining length consistent. Here you see where I'm crossing over the messy cross stitches that are holding the facings and vent flaps in place.  Eventually the lining will fold down and only 1/2" of the stitches will be visible.  The seams in the lining should line up with the seams of the coat.  It's nice when things work out this way.  


At the facings and vents the lining is folded down and slipstitched in place.  This creates what is called a take-up tuck, and prevents the lining from pulling up the hem when the garment is worn.  


The right vent is a totally different animal.  Again, I was thankful that I had clips in my lining material to mark the fold.  First, the fold is pressed and basted close to the edge of the vent. The lining hem on this side of the coat must be completed before going further.  Once the hem is complete come back to the vent and muddle through!  Sorry for the crappy directions, but that's the reality.  A clip must be made in the lining at the top of the vent, the edges are folded back and slip stitched in place.  The goal is to cover a multitude of sins as best one can.  You will sense what has to happen, but it's not easy.  I just try my best, knowing that it's all inside the coat where no one will see it.  


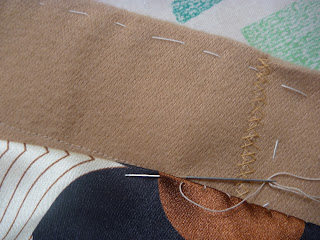
Lastly the lining is attached to the vent, which is where this whole process started!   I like to finish the edges along the vent with a pick stitch.  It's fun to do and adds a nice hand tailored touch.  

I have actually done all the buttonholes and buttons.  So this coat just needs a good steam pressing and I'll be ready to model it.  Tonight and tomorrow are supposed to be the coldest of season so far, so it will be a good test.  Wish me luck!  

Monday, January 2, 2012

Resurrecting the pea coat

Wow, this coat is way off track.  God willing, I hope to wrap it up this week.  Even though I haven't been posting, some progress has been made.  

I ran into a major roadblock when I realized that I had screwed up buying the shoulder pads for this project.  I'm a horrible shopper and picked up two right shoulder pads instead of a right and left.  I fired off an email to Peter of Male Pattern Boldness fame, and he graciously sent me two lefts.  What a guy!  I owe him lunch the next time I'm in NYC.  


While I waited for the shoulder pads to arrive, I entertained myself by making my own sleeve heads.  These are 2.5" wide strips of my "wool" fabric basted together.  Because this coat really needs a more structured shoulder I made a double layer.  The bottom layer is approximately 6" long.  Once basted together they are backstitched into the sleeve seam right over the cap of the sleeve.  The edge of the sleeve head should be even with the armscye seam allowance.  


I then discovered Laura Mae's blog Lilacs and Lace via MPB.  This gal banged out a full length wool coat, completely lined (and underlined no less!)  in less than a week!  Talk about a jaw dropping moment.  I was still waiting for the shoulder pads to arrive, so I decided to underline the back of my coat with some left over cotton flannel.  I flipped the coat inside out to get the lining out of the way and basted the flannel in place.  The flannel underlining was then whipstitched to the side / back seam allowances.  It added some much needed heft, and hopefully warmth, to the back of the coat.  


Totally unorthodox, but it worked.  Thanks for the inspiration Laura Mae! 

Before sewing in the shoulder pads I secured the canvas interfacing to the arm hole seam allowance.  Up to this point it's just been flopping around at the shoulder.  


The shoulder pad is then aligned with the edge of the armscye seam allowance and pad stitched to the canvas.  I have to slide my hand in between the canvas and the coat fabric to keep from catching the coat fabric with these stitches.  If the fabric gets caught it will create an unsightly dimple on the outside of the coat.  


Here is the completed pad stitched shoulder pad.  There is no canvas on the back of the coat so the pad is basted into the arm hole seam allowance.  If the shoulder pad projects past the seam allowance it should be trimmed back.  

With the shoulder pads and sleeve heads in, I can complete the lining.  Yay!  The end is in sight.