Showing posts with label Roberto Cabrera. Show all posts

Thursday, February 15, 2018

Next up -- Wedding #2

Here we go, another wedding! This time, my beautiful and uber talented daughter is marrying. The place -- Oakland, CA. The date -- April Fool's Day (which also turns out to be Easter this year).


My travel arrangements are all made, but my Father of the Bride wardrobe is sorely lacking. My daughter floated the idea of my wearing my whole Scottish kilt garb, but I think it's way too flashy. I think the bride should be the star of the show, not her crazy old man. Call me old fashioned, but I think a dark (dark-ish) suit is called for.


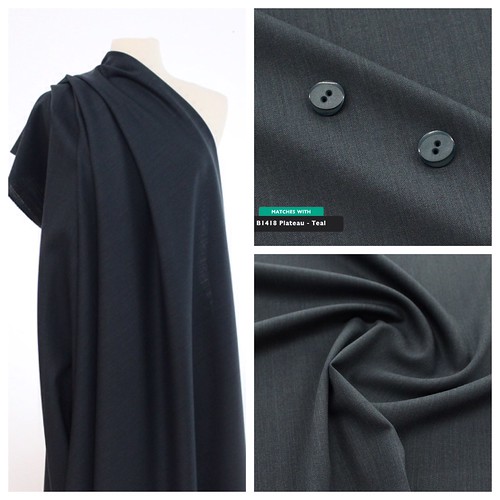
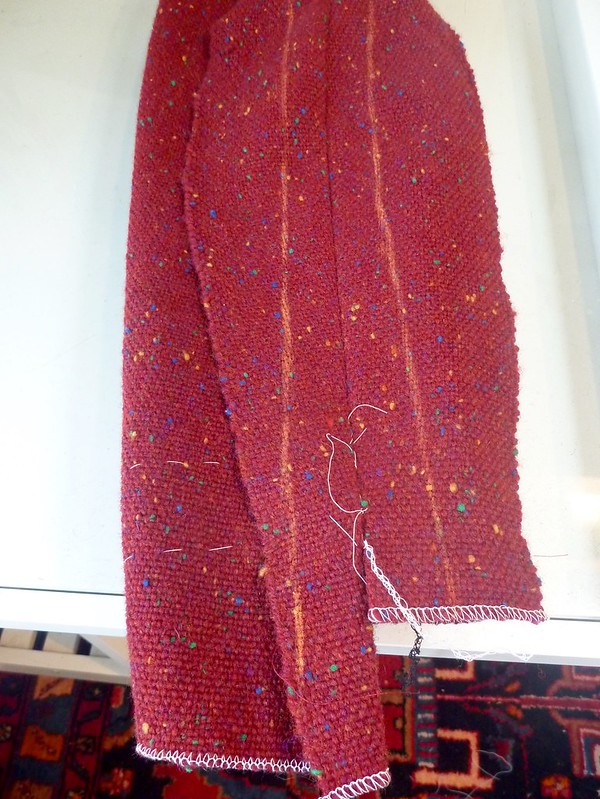
Enter "La Mer" from Sawyer Brook Fabrics, a heathered / striated 100% wool suiting from Italy. Wow! The quality of this fabric completely exceeds my expectations. I ordered it from a swatch and can't be happier. The yardage I received is flawless, and I absolutely love the color -- a dark teal blue. (Unfortunately my cheap point and shoot camera does a horrible job capturing the color). Sawyer Brook offers a swatch service, which I will most likely subscribe to. Their retail store is in central Massachusetts, about a 3 hour drive for me, and I can easily foresee a field trip in my future.


I prepped the fabric using the London Shrink method. I've done this many times, and it's a safe and reliable way to preshrink wool fabrics. Cotton sheeting is soaked in water and then well wrung out. It's sandwiched into the fold of the material.


Once everything is sandwiched, the fabric can be folded up and wrapped in plastic to set overnight. The moisture from the sheeting is absorbed into the wool to create a uniform dampness. The yardage is then air dried and ironed. This suiting required almost no ironing once it dried. There are benefits to working with high quality fabrics!


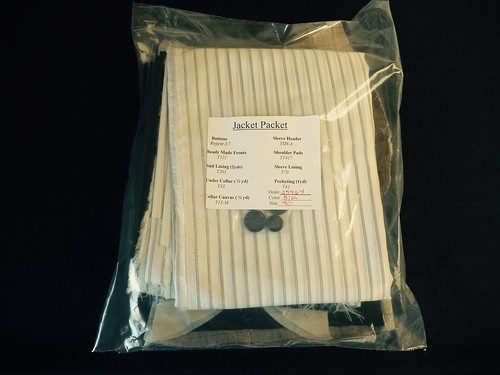
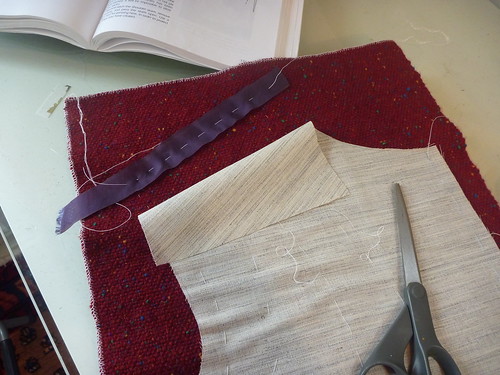
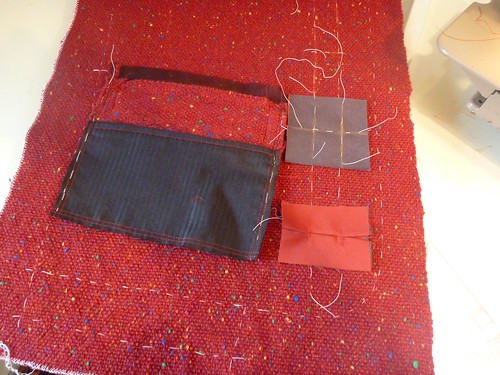
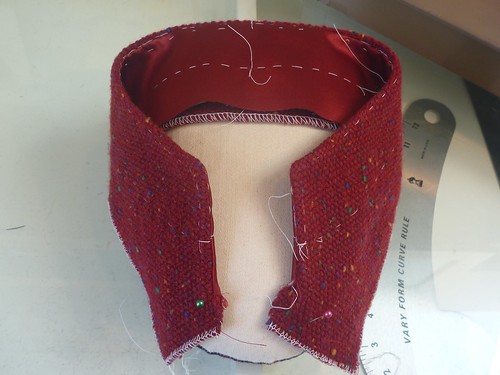
I have no access to menswear tailoring supplies here in Maine. Maybe you have the same issue? Fear not, B. Black and Sons to the rescue. They offer a "Jacket Packet" which contains everything you'll need. A pair of premade haircanvas jacket fronts, more than enough lining material (I think you could actually screw up a piece and have enough to recut another!). Sleeve lining, a huge piece of pocketing, collar felt, a strip of French canvas for the collar, shoulder pads and sleeve heads. (The buttons aren't so hot). This packet is my "go to" when a trip to NYC is out of the question.


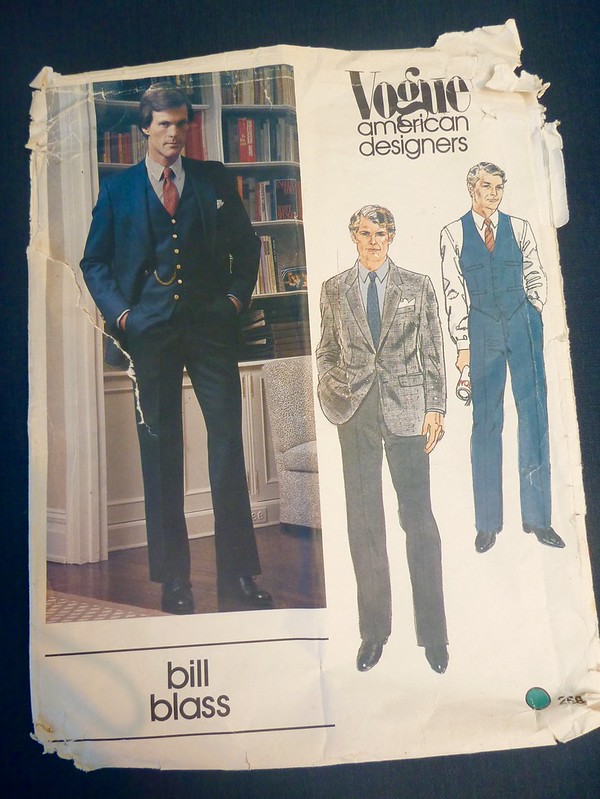
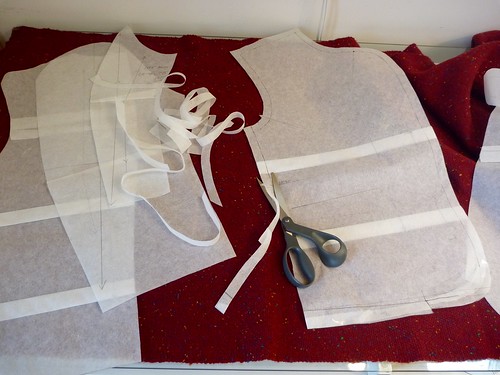
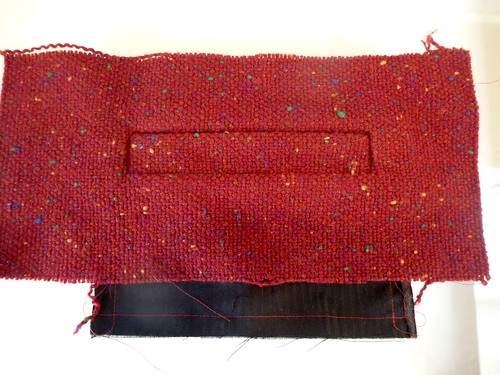
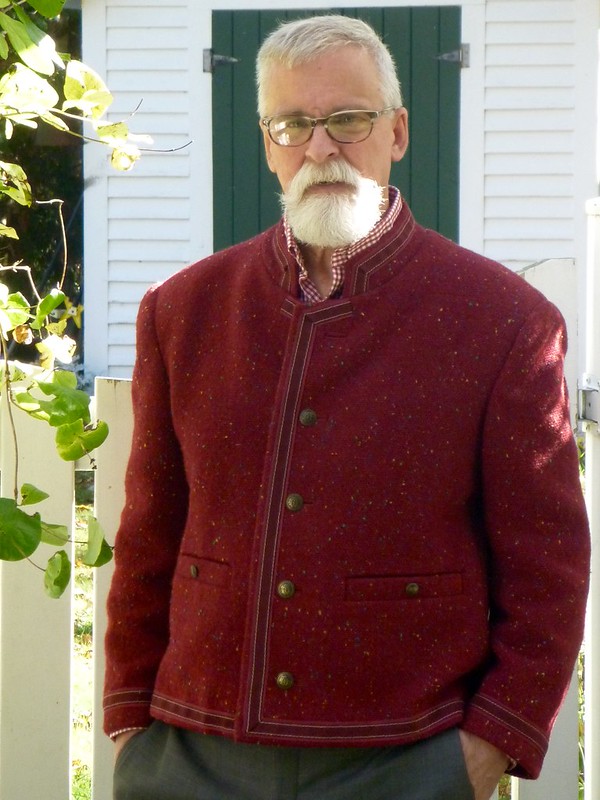
I'll be using my old standby, this very beat up Bill Blass suit pattern from the early 80's. This is just a nice all around jacket pattern. No crazy lapels, typical menswear pockets, vented sleeves and double back vents. I've only made the trousers once, but they're also straight forward, classic.


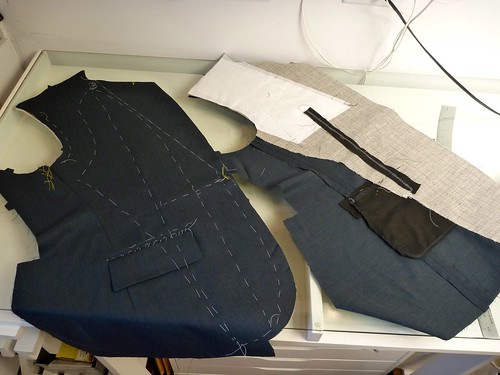
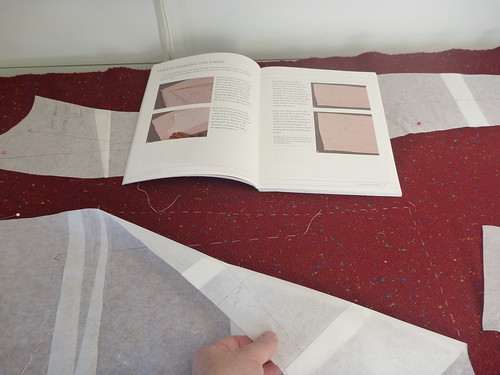
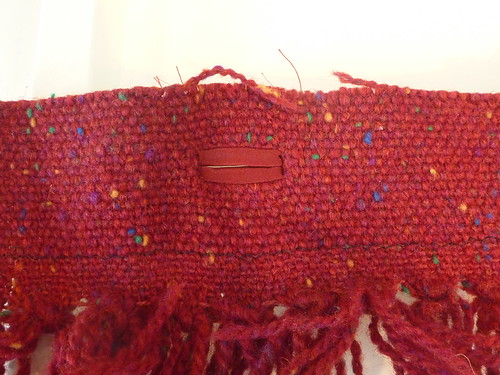
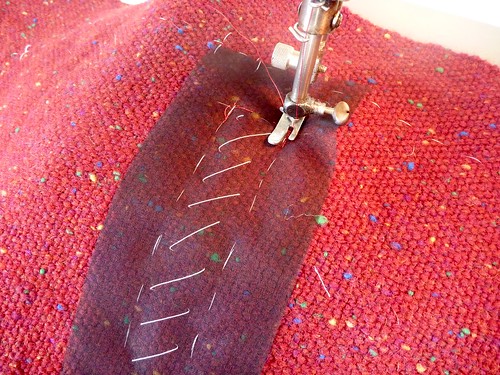
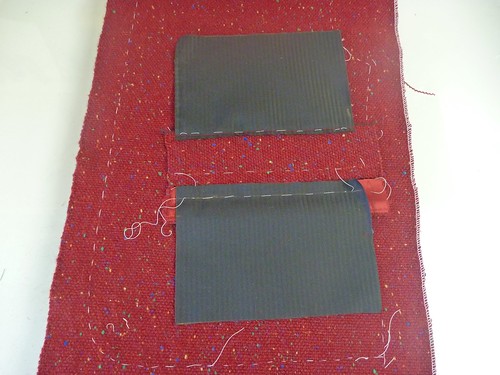
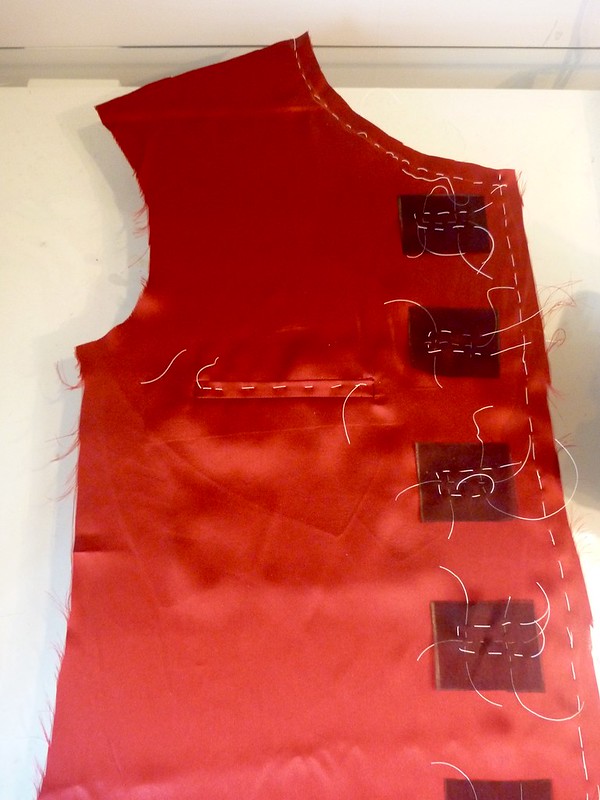
I won't go into great detail. The jacket fronts are by far the most work. I use Roberto Cabrera's book on menswear tailoring as my guide. None of it is particularly hard, it just pays to be as accurate as possible, both in measuring as well as sewing. If I'm tired or "just not feeling it" I put everything aside. Things go so much better when I'm fresh, which is usually the next morning.


Another huge benefit is having the right thread to work with. Real cotton basting thread and a spool of silk thread that matches the fabric makes the work go so much faster, and with less aggravation. So much of tailoring is about control. All the basting is about taking control of the fabric and making it conform to the body.


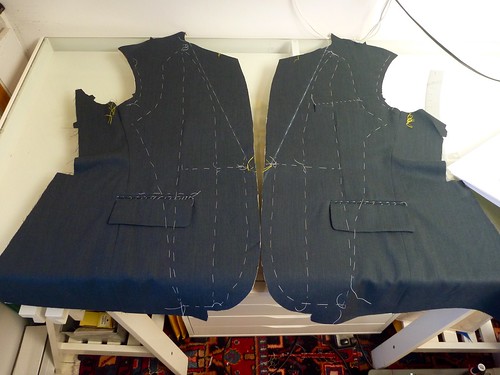
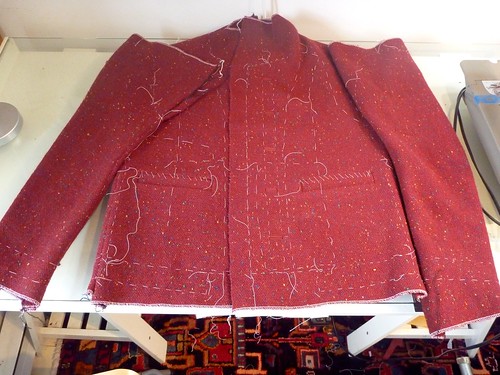
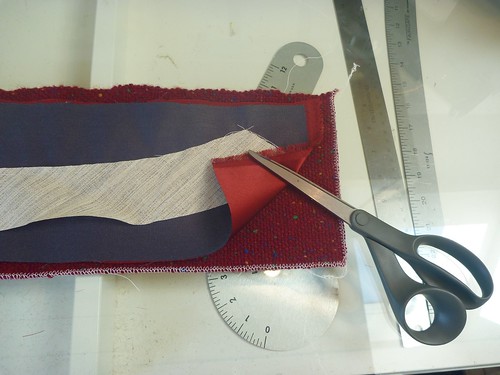
Here are the completed fronts. From here I like to move to the sleeves. They're made fully lined, and there's a fair amount of fussy work around the vents. I HATE working with polyester lining material, so the sooner this part is over the better!


So far, so good. Be well, and enjoy your current sewing projects!


Sunday, December 24, 2017

The ?Couture? Jacket -- Wrap-up

Do you remember that I was considering making a "French Couture jacket"? It was ages ago. You've probably forgotten the whole thing. I armed myself with Claire Schaefer's book, cranberry wool tweed woven by my mom, bronze buttons and some foufy mohair trim. So what the hell happened.....where to begin?

The general consensus from you, my readers, was that the froufrou trim had to go. I'm just not Pharrell Williams enough to pull that look off. On me, it would be "ladies who lunch" gone WAY wrong. So I went back to the trim stores in NYC and settled on a burgundy faux suede with contrast edge stitching. Decidedly simpler but not flexible enough to conform to my pattern's curved collar and lower front edges. Rather than fight with the trim to make it curve, something it was NEVER going to do, I squared off the collar and jacket fronts. In sewing, as in life, you have to pick your battles.


Overall, the pattern was fairly easy to fit. I increased the width of the collar (there just wasn't enough room for the trim), shortened the body by about 4" and added extra curve to the upper back (the dowager's hump adjustment, ouch! Like that doesn't make me feel ancient). Then the real games began.


Straight up....if you're looking for the most complicated and time consuming way to construct a garment, this "Couture jacket" will be right up your alley. None of it is particularly difficult....cumbersome is the word that comes to mind. Here I'm cutting off all the pattern seam allowances to start.


Then the pattern shapes are thread traced onto the fabric. There is, of course, a very specific way in which this is done. Thankfully, Schaefer's book is well illustrated. The grain line, notches and any other marks are also marked with thread. Get ready to use a huge amount of cotton basting thread!


Each thread traced piece is on a rectangle of fabric. I swear, the real "luxury" of this construction method is the shear waste of precious fabric that ensues. The fabric gets handled extensively, so I ran all the cut edges through my serger to prevent raveling.


I'm not really sure what part this is, but the thread traced seamlines get lined up, basted together (harder to do accurately than one might think), and then sewn on the machine. I then chalk marked generous seam allowances and ran them through the serger to both finish them and cut them down to a manageable size. So much of my mom's handweaving went into the trash. Criminal.


This is about as far as I got sticking to Claire Schaefer's directions. I started to veer off on my own course... more tailored jacket, less floppy cardigan.


I'm sure Coco rolled over in her grave on this one. I interfaced my jacket fronts with a lightweight hair canvas. The "couture jacket" has just the tiniest strip of silk organza selvedge caught in the front edge openings. I also stabilized the shoulder seam with a semi-bias strip of lining material. That's a Roberto Cabrera thing.


Veering even further of course, I wanted welt pockets and bound buttonholes. Not the patch pockets and handworked buttonholes that are the hallmarks of the couture jacket. Oh, and that "Coco-ism". -- "No button without a buttonhole". Forget that!

I don't know about you, but I always like to practice the tricky bits before I launch into something that has the potential of ruining a project. So....


This is a mock up welt pocket that I made with left over scraps. I used Edna Bishop's method. She calls it a "regulation welt pocket". It's surprisingly simple and straightforward once you get up the nerve to start slashing your fabric! For this jacket, I needed to prove to myself that it was going to be possible, considering the bulk of the fabric. I tried to reduce bulk in every way possible.


As luck would have it, making the pocket was entirely possible. The welt is lined with silk charmeuse to reduce its thickness, and there's some serging that will never be visible to keep some seams flatter. So the welt pockets are a go.


I also made a trial bound buttonhole. The welt is the reverse side of my silk charmeuse beefed up with a scrap of Fashion Sewing Supply's Pro-weft Supreme fusible. Reassured that these features are indeed possible, it was full steam ahead.


A piece of silk organza was used as a reinforcement for the welt opening.


The pocket in process. I baste a lot! But it's always time well spent.


Here is the finished pocket (a success) , and the beginning of a MAJOR screw-up. Maybe you see it. I positioned the welt for the second buttonhole on the WRONG side of the jacket. I blissfully followed Laura Mae's fabulous bound buttonhole tutorial (here), marked, stitched, cut open and flipped everything to the....

WTF have I done moment!!!!

Once my blood pressure was back under control, I set about correcting the mess I'd made. I positioned a new welt piece onto the outside of the jacket (where it should have been in the first place) and restitched everything directly over my original stitching. I then very carefully cut the incorrect welt away as close to the stitching as I could get. With tweezers I was able to remove any remaining fibers. Disaster averted. The buttonhole may be a touch smaller than the rest, but I don't think anyone else would notice. Fortunately, there were no other screw ups.


Arcane construction becomes the norm. Mon Dieu! I quite honestly can't remember how I attached the sleeves, but somehow it happened.

But I've blabbed on long enough. If you've stayed with me this far, scroll down through more "in process" pics to see the final result.


I wore this outfit to host a rehearsal dinner for my son's wedding in October. By then, all the complexities and frustrations of constructing the jacket were a thing of the past, and I just enjoyed wearing it. It truly turned out to be exactly what I wanted. My idea, my execution. A way to honor my mom's artistry and craftsmanship. A little bit French inspired (without the "Ladies Who Lunch" vibe), a little military, a little tyrolian, tailored (but not overly), with a hard to describe sensation of wearing something truly special.


As always, I am so grateful for the support and inspiration I receive from the sewing community. I've sort of fallen off the blog bandwagon a bit, but I still have projects to share. Be well, and happy sewing!


Monday, April 25, 2016

Blazer of 2016 -- Muslin #1

After weeks of procrastinating I jumped into the muslin phase, and it didn't take long to figure out that I've got my hands full with this pattern. There were some pretty glaring problems right out of the envelope. So I decided to do some "preemptive" adjustments.


First off, the center back seam is ramrod straight and I know that I have what Roberto Cabrera calls "stooped posture". Doesn't sound very attractive, but it beats Dowager's Hump any day! (Actually, I think they're one in the same). I need more curve to the upper back, otherwise the collar will pull away from the back of my neck. Not a good look.


The fix for this is to create a 1/2 to 3/4 inch dart from below the arm hole to the center back. This has the effect of tilting the upper jacket forward. So here you see my adjusted pattern over the original.


To prevent the front of the jacket from drooping down, a corresponding dart is made on the jacket front.


And it looks like this.


Sleeves on jackets are always too long for me, so I shortened the sleeves by 1 inch.


I removed 1/2" both above and below the elbow on the "shorten here" lines from my pattern. Using Swedish tracing paper makes this a breeze. I just fold it and stitch a 1/4" seam on my machine. I also reduced the ease on the sleeve cap by 1". My goal is to create a more natural shoulder. Time will tell if I can pull that off.


Lastly, I noticed the the front and back shoulder seams are the same length. According to Cabrera the back shoulder should be at least 1/2" longer than the front. Easing the back into the front creates room for the shoulder blade. I don't have a picture, but I simply added 1/2" at the arm hole side of the pattern.


So here's what those changes turned into.....


The center back adjustment has worked, but I think I still need a touch more curve. As you can see the collar still doesn't want to sit against the back of my shirt collar. The shoulder seam is also running to the back of my shoulder. This isn't a fitting issue addressed in Cabrera, but I feel that the shoulder line needs to be swung forward about a 1/2" so that it sits closer to the apex of my shoulder. It would be a simple fix. Please chime in if you know the answer to this problem! Am I on the right track? My gut just tells me it needs fixing.


Eeeeek. The big problems are up front. The neckline is just too wide. Plus, I feel the jacket pulling across the shoulder / upper chest like there just isn't enough fabric there. I think the solution to this mess may be two pronged. I'm going to try redrawing the neckline to add a bit of fabric towards my neck, in addition to slashing and separating the upper chest portion a small amount. Maybe 3/8" to start. I'm open to all suggestions on this one. Something's gotta give!


All these wrinkles are telling me I need a substantial belly adjustment! Also, the button placement (marked with chalk) on the original pattern is unusual to say the least. I'll need to lower the stance by bringing the top button down at least to the level of the pin, maybe even lower.


Before sending this muslin to the dust bin, I let the side seams out about 3/4" on each side.


This was the only glimmer of hope in what was, over all, a pretty dismal start.


On a brighter note......I picked up some lovely thistle design blazer buttons on eBay.


These are from Waterbury Button in Waterbury, CT. "The brass Capitol of the United States". I love them. Now I just need to build a damn jacket around them!


Thursday, December 17, 2015

A flannel shirt to close out the year.

I'm pretty much set for the staff Christmas party / potluck next week. Skip the velvet blazer, bring on the flannel!


I bought the fabric this summer at Peter's MPB day. It's from Metro Textiles and was so inexpensive it's almost embarrassing. It's much beefier than any of the flannel offered at the "LL" store a few miles from here. The pants are a hack of Thread Theory's Jedediah Pants.


I always like a left chest pocket on my shirts but I'm not crazy about plaid patch pockets cut on the bias. Throw in the patchwork and I envisioned an even bigger mess. My solution was to make a welt pocket with a flap.


The welt is made with some solid red flannel I picked up at my local JoAnn's. I also used it for the inside collar stand, inside yoke and inside of the cuffs to help reduce bulk. All those patchwork seams can make for a very lumpy shirt.


The pocket bags are black flannel from my stash. I use the instructions from Roberto Cabrera's mens tailoring book. It's actually a double piping pocket for the back of a pair of trousers with just a slight twist. It's surprisingly easy to make, and results in a neat French seamed pocket. I've never posted a tutorial, but if there's any interest in how to sew this type of pocket, I could be talked into it.


As always, I'm greatful for all the friendship and support I've received through the sewing community. See you in 2016!


Peace.