Tuesday, September 27, 2011

The steampunk brocade vest, oh yeah

I've wanted a steampunk wardrobe for almost a year now.  On my very infrequent trips to NYC, I've been collecting the components to make it.  The materials for this vest have been hanging around for months, and I needed a break from the Japanese pattern book.  Deciphering all those diagrams can be exhausting.  To say that I'm thrilled with how this turned out is an understatement.  

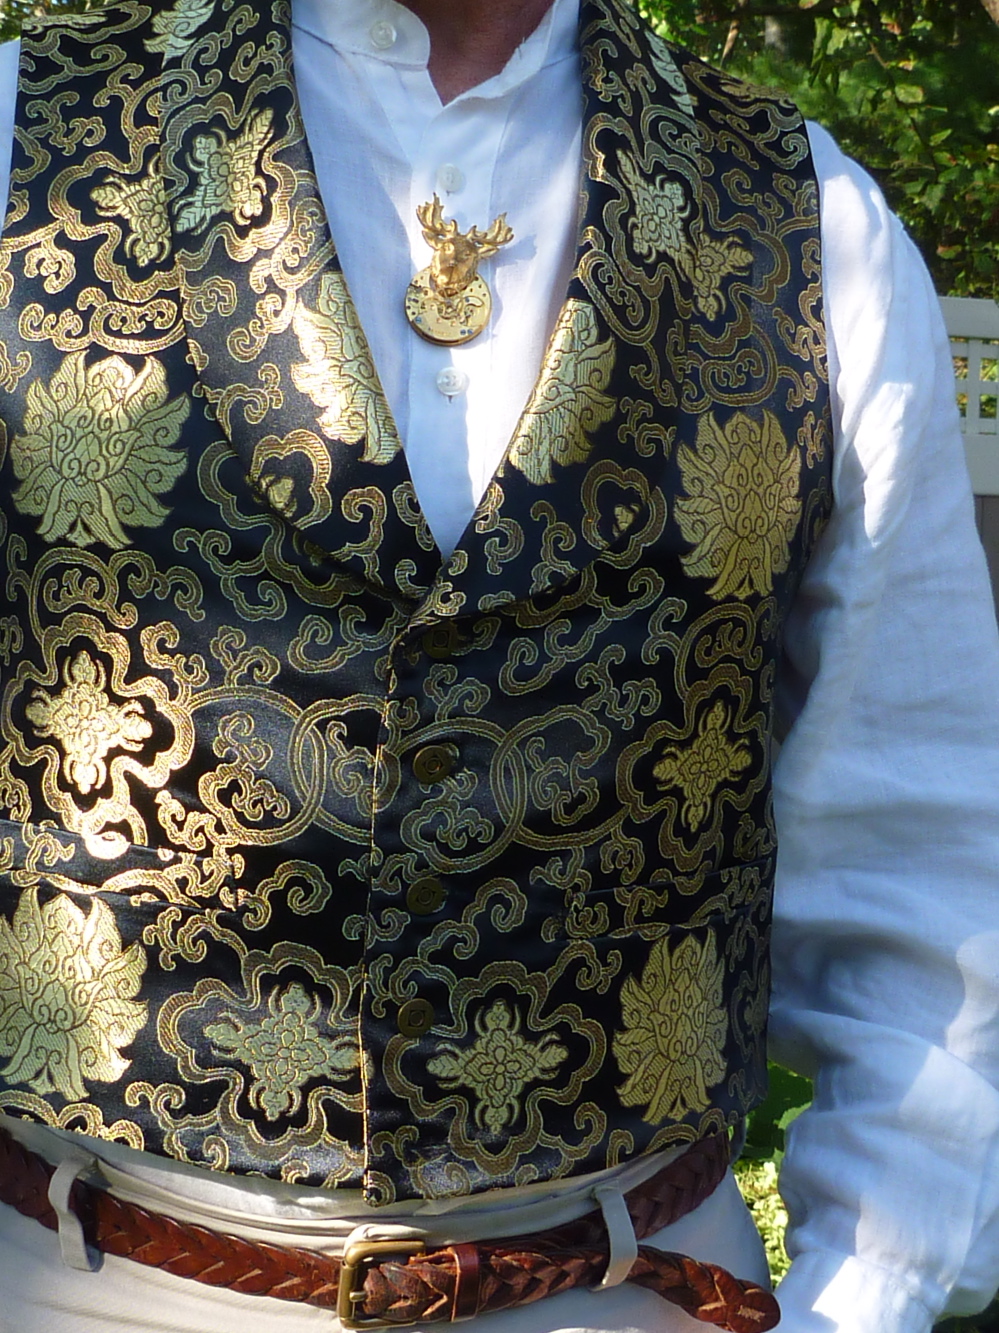
If you're interested in making a Halloween costume this isn't your pattern.  This pattern is from Laughing Moon Mercantile  (#109) and can be found all over the web.  There is both a double and single breasted Edwardian frock coat, and 2 vests.  This is vest B which features 2 welt pockets and a shawl collar.  Love! 
If you make this pattern you will definitely want to make a muslin first.  The shoulders were bizarre and required some work.  I also dropped the front of the vest down 1".  The pattern is taken from a historical garment and was intended to be worn with very high waisted pants.  


My fabric is a polyester brocade that was $10 / yd.  This can be found all over the garment district in NYC, and I probably paid too much for it.  It coordinates with a warm brown herringbone wool that I will be making the frock coat with.  It was also a bargain at $10 / yd at the ultimate fabric dive, H&M fabrics on W. 35th St.  
There is a good deal of tailoring involved with this pattern, but the effort is well worth it.  The upper collar is interfaced with hair canvas, and twill tape is hand sewn over the fold line.  It makes for a substantial roll of the collar.  My only issue with the pattern is that the undercollar wants to "fall out".  I solved this by pick stitching the undercollar into the twill tape of the fold line.  Problem solved.  The pattern also calls for topstitching everywhere which I just think looks cheap.  Shawl collars with topstitching are just wrong.  


Little antique brass buttons were the finishing touch.  


The facings really kick the whole thing up a notch.  Do I adore it?  Yes!!!!   Thanks to my amazing daughter Meredith of Oakland, CA for the steampunk brooch.  Now I have something deserving to wear it with.  


The completed trench coat


The coat has actually been finished for awhile.  I was hoping to have a photographer and some gritty Asbury Park, NJ backgrounds.  But my photographer was only available before his work day begins, and we both totally forgot that it's pitch black these days before 7 am.  C'est la vie.  So here I am in my garden in Maine.  


Remember there was a time that I wanted this coat to be longer?  Now I'm not so sure

The fabric is a lightweight stretch denim twill in what I'd call loden green.  I had never worked with a stretch fabric before.  I have to say that it sewed up like a dream and is very resistant to wrinkling.  It was $8 yd in the Peron's half price room on W. 40th.   Funny, I've never seen another thing that I liked in there.  


My goal now is to have the coat waterproofed.  I've checked with my local dry cleaner and they no longer do it.  The chemicals they used are no longer legal.  Does anyone have any experience with this?  Please chime in.  


Here's a glimpse of my most recent project.  Every man needs a brocade vest, right?  I'll do a short post on it soon.  

Thursday, September 8, 2011

Please don't call the couture police!

Sewing a lining in by hand may be tres couture, but it's difficult to do and do well.  You probably all know how much I hate working with polyester lining material, so the quicker I can be done with it the better.  Here is the completed lining (minus its hair canvas front interfacing which was basted on after taking this photo).  Truth be told, I almost forgot it!  While making the muslin for this coat I figured out that I could attach the collar and the lining at the same time.  The instructions (just diagrams) made it way too complicated.   


I started by basting the collar stand to the neck edge of the coat.  The neck edge had been stay stitched and I clipped the seam every inch or so.  The clipping lets the neck edge "flatten out" and makes attaching the collar much easier.  

The lining is then "married" to the coat, sandwiching the collar in the middle.  I pinned it together for starters and then basted the hell out of the entire seam.  There is a lot of fabric to contend with so some patience is required.  The "Big Seam" starts at the bottom hem of one of the front facings, comes up the front of the coat to the top of the lapel, pivots, crosses over the neck edge to attach the collar, pivots at the top of the other lapel and then continues down to the opposite hem.  I really took my time at the machine, stitching just an inch or two at a time, then readjusting the fabric which seemed to be all over the place.  


The whole mess is flipped inside out and Voila.  The collar is attached and the lining has a neat clean professional appearance.  The only part of the lining that will need to be hand stitched is at the back vent.  I plan to do this with a prick stitch, which is both fun to do and looks great.  


This coat is really on its way to completion at this point.  

Wednesday, September 7, 2011

Tackling the details


The details of this coat have been both challenging and fun.  All of the small parts are made first and then they get incorporated into the larger seams that actually turn it all into a coat.  


Here are the epaulettes and the right front storm flap.  I've become a "baste-a-holic" after making the wedding jacket, so you'll see that things are basted into position.  Basting has really improved the quality of my work, and it beats the hell out of getting my fingers stuck with pins constantly.  


There are straps at the cuffs that will button into position.  


I've constructed an inside left chest pocket, which is a nice detail to have on any coat.  I like having a place to put a letter, directions, map or phone.  This is called a double piping pocket and it's surprisingly easy to make.  The Roberto Cabrera tailoring book walks one through it step by step.  The extra hour spent working on this detail is well worth it.  


Making the collar was great fun.  The undercollar was supposed to be a single piece cut on the bias, but I didn't have enough fabric.  Making it in two pieces made absolutely no difference in the end.  Hair canvas interfacing was basted onto the wrong side and then held in place by decorative topstitching.  It makes for a very substantial collar.  


Here is the finished collar / collar stand unit.  A tailoring ham is great for pressing and shaping the curve of the collar.  The bottom of the collar stand will be basted together.  The next, and maybe most challenging step, will be to sew the coat, lining and collar all together in what I'm calling the "Big Seam".  

Thursday, September 1, 2011

TC = { (a2 + b2 +(cde)} in other words a trench coat is equal to the sum of its details?


For me a trench coat is all about the details.  There's just so much stuff going on! Epaulettes, storm flaps, belt loops here and there.  Maybe one of the reasons I've delayed making the coat is all of these details, which are usually topstitched to the Nth degree.   In my opinion if they're not done well, the whole coat looks like crap.  I'm using my Singer 301 which does a fine job of straight stitching, but I really struggle with edgestitching.  So I'm going to forego the double topstitching and will just topstitch everything at 1/4".  Call this playing it safe ( and knowing my limitations). 


3 of the 4 patterns in this book have welt pockets, but none of them are constructed the same way.  I'm getting more comfortable with them, but there's still something unnerving about slashing the fabric to make the pocket.  To calm my nerves I made a quick mock-up of the pocket with some sheeting.  It's nice to know where I'm headed, and it's good practice.  


This trench coat has rows of topstitching on the undercollar and the outside of the collar stand.  I decided to repeat this detail on the pockets, so before actually forming the welts, I topstitched rows 1/4" apart on the outside of the pocket.  The welts are then folded right sides together, the edges are stitched and the pocket is turned.  


Here is the final result. 


Because I live in a cool climate, I like putting my hands into warm pockets.  So I constructed one half of the pocket with black flannel and the other half of cotton pocketing.   For those of you with access to NYC, the flannel is from A & K Fabrics on W 39th.  It's 120" wide and only $10 / yd.  That's a lot of soft warm pockets!   

Here's the view from the outside.  Now it's on to the collar and the other little bits and pieces.