Showing posts with label sleeves. Show all posts

Friday, November 14, 2014

Constructing my Faux Missoni

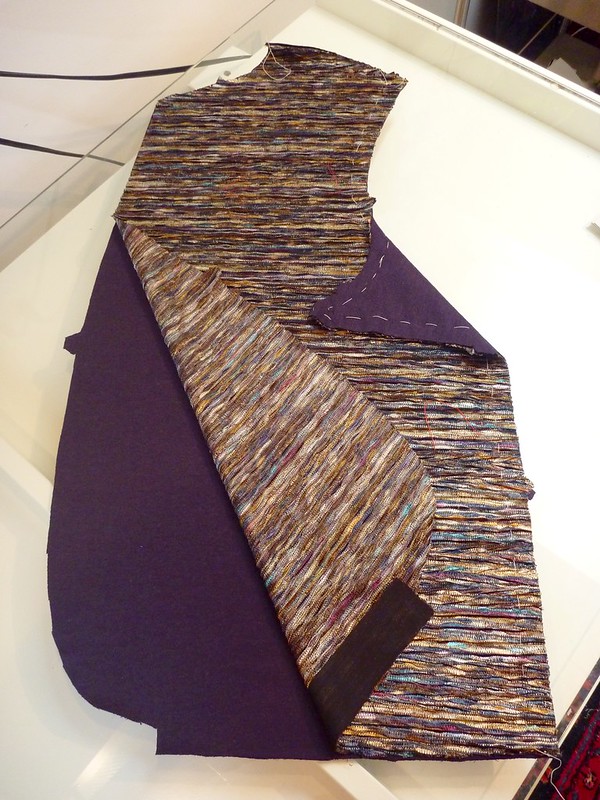
The "Chase Crush" Missoni-esque knit that I've chosen for this project is pretty light weight and VERY stretchy. It just doesn't feel substantial enough for a jacket. I had also ordered a dark purple bamboo knit from Vogue Fabrics, thinking that I would use it for Thread Theory's new Finlayson Sweater, but it also feels too light. My solution is to combine the two fabrics. Interlining with the bamboo will give me the heft I need. It's also incredibly soft. I wish you could feel this fabric. Soft as any cashmere sweater.

So here we go!


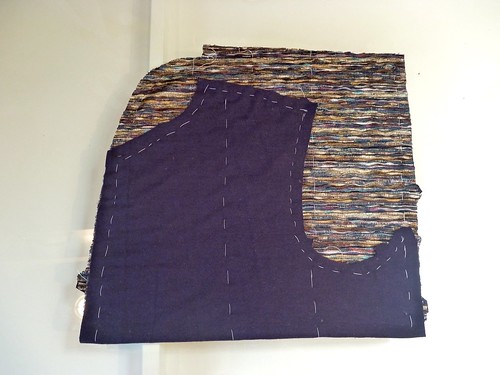
I'm a "baste-a-holic" so none of this bothered me. The pattern pieces were cut and then sandwiched together to act as a single layer of fabric. This process went quickly using cotton basting thread. It's amazing how having the right thread can make all the difference. This type of thread is virtually tangle proof, so you just zip along. Highly recommended. I threw in some extra vertical and horizontal lines of basting to keep everything in place.


I learned from making my muslin that knits want to roll up after they've been cut. My Missoni-esque fabric is no exception. It's also quite loosely knit and I was worried about its stability. (Probably totally unfounded, but I'm new to knits and they unnerve me!). As extra insurance I applied a fusible knit interfacing to the hem of the jacket. This is Pro-Tricot Deluxe Fusible interfacing from Fashion Sewing Supply. This is a whisper weight stretch fusible, and was SO easy to work with. It fused effortlessly with very slight pressure on a wool steam setting. All my rolling and stabilization issues solved! Maybe I can work with knits after all.


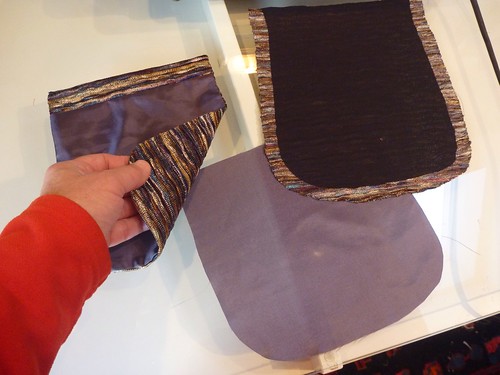
The patch pockets were stabilized with interfacing, and then lined with some leftover acetate from my stash of scraps. The pattern doesn't include this step, but then again it's a "quick and easy" pattern. I figure if you can make something better, why not take the time. It can sometimes make the difference between a garment you really love to wear, and one that just sits in the closet.


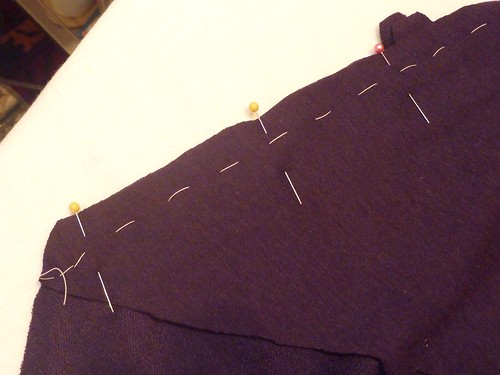
All the seams were both basted and pinned before stitching. I'm happy to report that I had absolutely no difficulty sewing this on my Singer 301(a no frills straight-stitch).


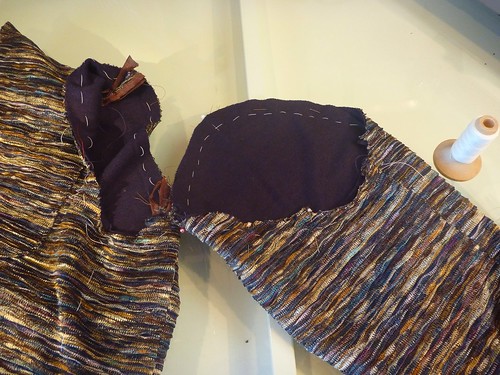
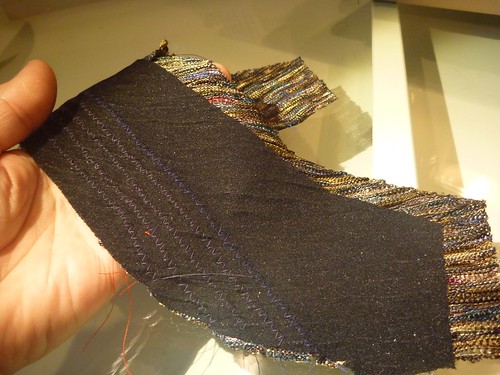
I wanted the sleeves to be lined so that there would be no raw edges to be finished. I used the technique from Roberto Cabrera's book on men's tailoring, (minus all the handstitching!). The inside out lining is place on top of the inside out sleeve with the seams aligned. I then zigzagged the seam allowances together so there would be some stretch. (Here you can also see the interfacing appplied to the cuff hem.) After zigzagging the seam allowances, I reach down through the lining and pull the sleeve up through it. Bam! A perfectly lined sleeve.


The two layers are then basted together at the top to keep the fabric acting as a single layer.


While I had my little Brother zigzag machine out, I added parallel rows of stitching along the roll line of the under collar toward the neckline as suggested in the pattern directions. This helps make a more substantial and stable collar.


Things are moving along, and I'm thrilled with my results so far. Next up is figuring out how to make a buttonhole in this kind of fabric.


Tuesday, February 26, 2013

Sleeves

Welcome back. This post is all about the sleeves. Again, it's not a tutorial, just an overview of the process. For us sewists there's a great deal of satisfaction to be had by a well set sleeve. Am I right? Do you find yourself looking at the sleeves on couture garments on Style.com? I do. The bar is set high, so let's jump in.


The upper and under sleeves are sewn along the unvented edge and pressed open. Cut a 5" wide strip of bias pocketing and place it behind the sleeve so that it lines up with the tops of the vent extentions. The bias cut allows this strip to be pressed into a curve to better mimic the shape of the cuff.


Working from the front, the strip is basted to the sleeve along the seamlines of the vents and along the fold line of the hem.


The piece is flipped over, and the excess pocketing is trimmed away. I think you can see in this photo that I've also basted across the top edge of the pocketing to hold it in place.


Next using the basting as a guide, the vent extentions are folded in and the sleeve hem is pressed up into position. A mitre is folded at the corner of the upper vent. Cabrera advises against trimming any fabric out of this fold since it makes future alterations of the sleeve impossible. It also gives some weight to the vent. However, I felt that the corner was just too bulky with this fabric, so I broke his rule and clipped a chunk of fabric out. It made a huge improvement. I'm not planning on any sleeve alterations in the future. Plus, I think my arms have stopped growing.

Complete the hem by slipstitching the fabric into the pocketing. It's just so much easier to get all this done with the sleeve flat.


I think this is also a good time to make the buttonholes on the upper vent. I'm not intending these to be functioning buttonholes. Sorry, but it's a couture touch that I just don't need. I mean really, when is the last time that anyone had to unbutton their jacket cuffs? Certainly not me. I'll be just as happy with the buttons sewn onto faux buttonholes. This will also greatly simplify the lining of the sleeves.


The sleeve is then sewn shut. Now it just needs to be set into the jacket.


Before I get started on this, please don't get discouraged. What looks like a lot of work actually goes along very quickly. It's just basting, and it doesn't have to look pretty. It will all get pulled out in the end anyway. I've found that the benefits far outweigh the time spent on these steps.


So, a crossgrain strip of pocketing (mine is 7/8" wide by 20" long) is basted around the edge of the armhole. Peel back the canvas and diagonally baste only to the fabric. The strip starts at the front notch, goes up over the shoulder and down the back to the underarm. Only about 2 or 3 inches of the armhole will be unreinforced.


You will want to go around twice. First baste close to the armhole edge. Next try to baste close to the other edge of the strip. Some of your stitches may miss the mark. It's no big deal. Just work along and you'll be surprised at how quickly this goes. Trust me, in the end this will all be worthwhile.


Cabrera sets the sleeve, creating the ease over the sleeve cap entirely by hand. I've tried and find it impossible to do. I machine baste the seamline of the sleeve cap and pull up a thread to create the ease. I adjust the ease as I pin it into the opening.

Ok, with the sleeve pinned into place, baste it close to the seamline with 1/4" stitches. Once you have gone around, go around again, this time placing the stitches in the spaces between the first round of basting. Why? Because now you can take out all the damn pins and there is practically no chance that you're going to get a little "catch" as you sew the sleeve in.

Trust me, this actually goes much faster than you might think. And.....


The results speak for themselves.