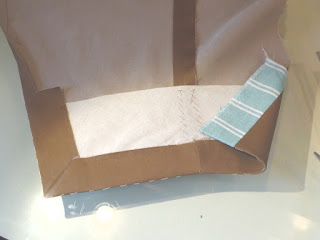
I spent the better part of a day working on the sleeves. I knew after making the muslin that they were going to take some effort to do well.
My plan has been to add some contrasting fabric to the sleeve vents. I extended the stitching line of the undersleeve vent and pinned a scrap of oxford cloth along the line. The stitching line is faintly marked with blue chalk on the right above. After stitching, the oxford cloth is pressed over the vent extension, trimmed and basted into position.
I pulled out my copy of Roberto Cabrara's menswear tailoring book to complete the sleeve vents. A 5" wide piece of bias cut muslin is basted to the bottom of the sleeve along the foldlines. It's held in place by stitching it to the seam allowances in the middle. I slide a metal ruler in under the seam allowance so I don't pick up any fashion fabric when I make these stitches.
Using the basting as a guide the cuff is folded up and a mitre is formed at the uppersleeve vent. This potentially allows the sleeves to be lengthened, although I don't expect my arms to be growing! The fashion fabric is hemmed into the muslin. I slide my fingers in behind the muslin to prevent catching the fashion fabric. I serged the edge of the undersleeve to save some time. I'm sure Roberto would be appalled, but this is just a casual jacket after all.
Here is the completed vent. I will probably secure it with a single button so that a hint of the contrasting fabric will be visible.
Oy! talk about easing. I think this shot shows just how much sleeve fabric has to be eased into the armscye.
After pinning the sleeve in place I baste around the whole mess twice taking a generous 1/4" stitch. This is another helpful tip from Mr. Cabrera. Once the sleeve is basted in place all the pins can be removed. I find this makes the actual sewing much easier. Less finger pricking! Plus, the basting practically eliminates the possibility of making a little "catch" somewhere that will have to be ripped out.
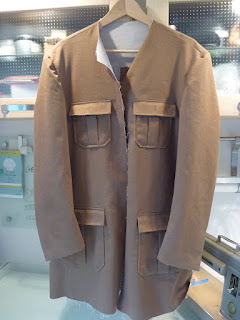
Here is the jacket so far with its sleeves attached. I'm counting on some interfacing and substantial wool sleeve heads to give it some much needed shoulder structure. Fingers crossed.
The collar is also finished. It's interfaced with bias cut hair canvas. The under collar is bias cut patchwork madras. The next step will be to construct the lining. (A step that I usually hate)


You inspire me to baste.
ReplyDeleteLOL. Real basting thread makes all the difference! It doesn't snarl which takes 99% of the frustration out of the process.
Delete